Video Transcript:
Hello
everyone, it’s Dale here. Welcome to the next video in the Recent Trades
section. In these Recent Trade videos, I want to show you the reality of
my trading—the reality of the trades I take on a daily basis. As I promised, I
won’t be cherry-picking only the best trades; I will also be showing you losing
trades. And today is the day I’ll show you a losing trade that I closed
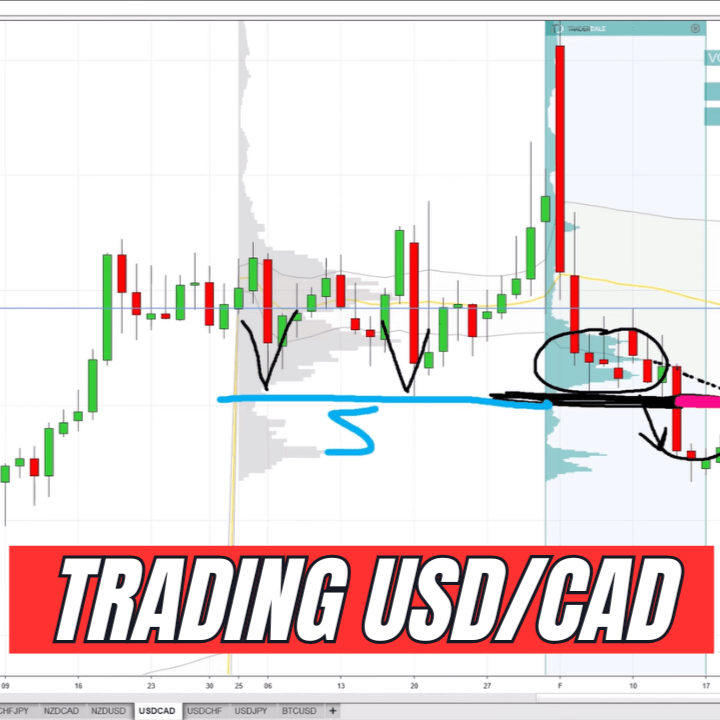
yesterday. It was a swing trade on USD/CAD.
So,
let’s check the trade. First, let me start by showing you the reasoning behind
this trade and why I entered it. What you see before you is the daily chart of USD/CAD.
This is where I do my swing trading analysis. The trade I took was a short, and
it was from here.
I’ve
moved the chart like this so you don’t see the outcome of the trade yet. Right
now, you see exactly what I saw when I entered the trade, so you can imagine
what it was like when I was deciding whether to take the trade or not. This was
the short trade entry.
Now,
the reasoning behind this trade—actually, there were a couple of reasons.
Reason number one, for me, is always volume—Volume Profile. I looked at this
strong sell-off zone using the Volume Profile, and there was a heavy volume
zone. This was a sign of sellers accumulating short positions in this circled
area. From there, the price moved downward. For that reason, I was waiting for
a pullback into the heavy volume zone, specifically to the beginning of that
heavy volume zone. That was my resistance level, from which I went short.
That’s the Volume Profile setup that I like to trade.
Reason
number two for entering this short trade was that the price had previously
reacted to this level. You can see those reactions right here. In the past,
this level acted as support. When the price broke below that support, it turned
into resistance. This is a price action setup—the second setup this trade was
based on.
There
was also a third setup: a VWAP setup. If you look at this gray line here, this
is the first deviation of the yearly VWAP. The price hit it from below, which
signaled a short trade. This is one of the VWAP setups that I like to trade,
and in this case, it confirmed the short.
So,
what we have here are actually three very good reasons to enter a short trade
from this level. A perfect scenario, I would say.
Now,
there was one risky factor here, and I mentioned it in the live room. The issue
was that if I moved the profile to analyze the entire area, it showed that the
heaviest volume was right here—exactly where I placed my stop-loss. My
stop-loss was above the wick of this candle—the highest candle in this area. I
based my stop-loss placement on the fact that it was behind this heavy volume
zone, so I had a very good reason to place it there.
However,
as you can see, the Point of Control of this whole zone was just slightly above
my stop-loss. That was the risky part of this trade. I was aware of it, but
there were so many factors supporting this short level that I weighed the pros
and cons and decided to take the trade despite the risk. A heavy volume zone
above a stop-loss can sometimes act as a magnet, pulling the price toward it
before reversing.
And
that’s exactly what happened.
Now,
let me move the chart and show you how this trade played out. As you can see,
the price moved past my short entry and continued toward the Point of
Control—this massive heavy volume zone—to test the liquidity there. So, yeah, I
took the risk, I lost, and that’s that.
But
if you ask me now, I would still say this was a good trade. I would enter it
again. There’s never a perfect trade—there is always some risk. In this case,
the risk was that the price might want to test the Point of Control, and that’s
exactly what happened.
As
you can see, I wrote a note on the chart: “The trade had bad stop-loss
placement.” I actually noted that before even entering the trade! But I
also wrote that the level was too good to miss. I liked it so much because of
the combination of the three trading setups.
So,
this is how it played out. I still consider it a good trade. As traders, we
need to weigh the pros and cons of every trade. That’s exactly what I always
do. And I try not to be upset if I take a trade like this and it ends up being
a losing trade. Every trader has losing trades—it’s part of the game. The
important thing is that we win more often than we lose.
And
that’s how we play.
Thanks for watching the video! I hope you liked it, and I look forward to seeing you in the next one. Until then—happy trading!