Video Transcript:
Hello
everyone, it’s Dale here. Welcome to the next video from the recent trades
section. In this video, I’d like to talk about a recent trade I had on USD/JPY.
It was a swing trade, which means a long-term trade, and I execute these on
daily charts. So, it’s not a quick in-and-out trade but one that takes longer
to develop. Let’s check it out.
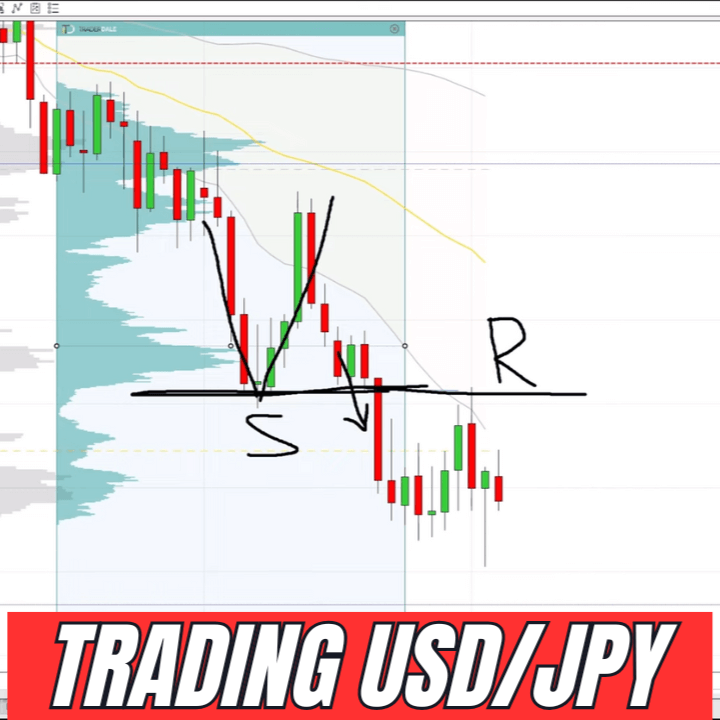
What
you see before you here is the daily chart of USD/JPY. I do swing
trading on the daily charts, which makes things a bit slower, but I don’t mind
that. Anyway, what I want to show you is a short trade that I took from here.
This was the resistance, and this is my short trade, right from here. As you
can already see, it was a beautiful trade. But the reason I want to show you
this particular trade is that there was a great combo, which you can also
implement into your trading when you spot it in the charts.
Let
me talk about the combo. The first part of this combo is a Volume Profile
setup. Volume Profile is my main trading tool, so I want to mention the Volume
Profile setup first. If you look at this strong downtrend area, you can see
that there were heavy volumes traded here. You can also use the Volume Profile
like this to look at a broader area, and it will still point you to this
massive heavy volume zone. What happened was that after these heavy volumes
were formed, there was a strong sell-off. As you can see, my short entry was
here, at the beginning of that heavy volume zone. This heavy volume zone
represents a place where sellers were active and adding their short positions.
The beginning of that heavy volume zone is usually a place where the price likes
to react—like this pullback and short from there. This is the Volume Profile
setup that I like to trade.
Apart
from this Volume Profile setup, there were also two other setups present at
this level. The second setup was a Price Action setup. If you notice this
reaction right here, the chart is telling us that this was a strong support
level. It was strong in the past because the price made a significant reaction
here. Then, the price moved past the support, and the support turned into
resistance. This is a Price Action setup, and as you can see, it also aligns
with the beginning of that heavy volume cluster right here. So, that’s a
two-setup combo.
But
we don’t stop there—there’s one more setup in play. This setup is based on
VWAP, or more specifically, on the first deviation of the VWAP. This gray line
is the first deviation of the VWAP, and at this level, it aligns with the other
two setups I showed you. So, we have a place where three independent trading
setups converge, and all three of them indicate strong resistance. This makes
it an ideal place to go short. As you can see, the price hit the high of the
day and reacted beautifully right here.
Now,
let’s talk about the take profit and stop loss, as these are also important.
The stop loss was placed in a low-volume zone, right here. The reason I like to
place stop losses in low-volume zones is that this heavy volume zone should act
as a barrier. This whole zone is a barrier, and the price shouldn’t move past
it. If it does, then the trade is invalid, and you take the stop loss. Above
this level, there is a low-volume zone, and if the price reaches that, there’s
nothing stopping it from shooting higher and higher. That’s why the stop loss
was placed in a low-volume zone.
Take
profit, on the other hand, should be in a heavy volume zone. Let me use another
Volume Profile here to show you. There was this heavy volume zone—I went short
from here and took profit in this heavy volume zone. The reason is that a heavy
volume zone can act as a barrier, potentially causing a reaction. When you are
in a short trade, you don’t want to risk the price reversing against you.
Instead, you want to take profit and be done with the trade. That’s why the
take profit was placed here, and that’s why the stop loss was placed there.
This
was the trade entry. As you can see, this was a trade with a risk-reward ratio
of 1:1. I’m quite fine with that. In my trading, I aim for a risk-reward ratio
in the range of 1:2. So, that’s about it for this swing trade on USD/JPY.
If
you’re interested in learning more about Volume Profile trading, head over to
my website at Trader-Dale.com. If
you click the button that says Trading
Course & Tools, it will take you to a page where you can browse my
trading education and custom-made indicators. If you’re interested in day
trading with me and other prop firm traders every day in a live trading room,
click the Funded
Trader Academy button. Here, you can book a one-on-one call with us,
where we’ll walk you through the Funded Trader Academy and help you decide if
it’s right for you.
Alright, that’s all for now. Thanks for watching the video—I hope you liked it! I’ll be looking forward to seeing you next time. Until then, happy trading!