
Video Transcript
I’ll show you exactly where to place
your stop loss and take profit using Volume Profile. There’s one simple rule
behind both. And once you understand it, stop-loss and take-profit placement
will no longer feel chaotic. You’ll have a clear, simple logic that you can use
on any trade. So, let’s get to it.
Take profit and stop loss could be
the place where a losing strategy could turn into a winning strategy. So, let’s
talk about the take profit first. There’s one very important rule to remember
about placing your take profit. And the rule is that you always want to place
the take profit before a barrier, at its start. That barrier is most commonly a
Heavy Volume Zone.
Let me show you this example to make
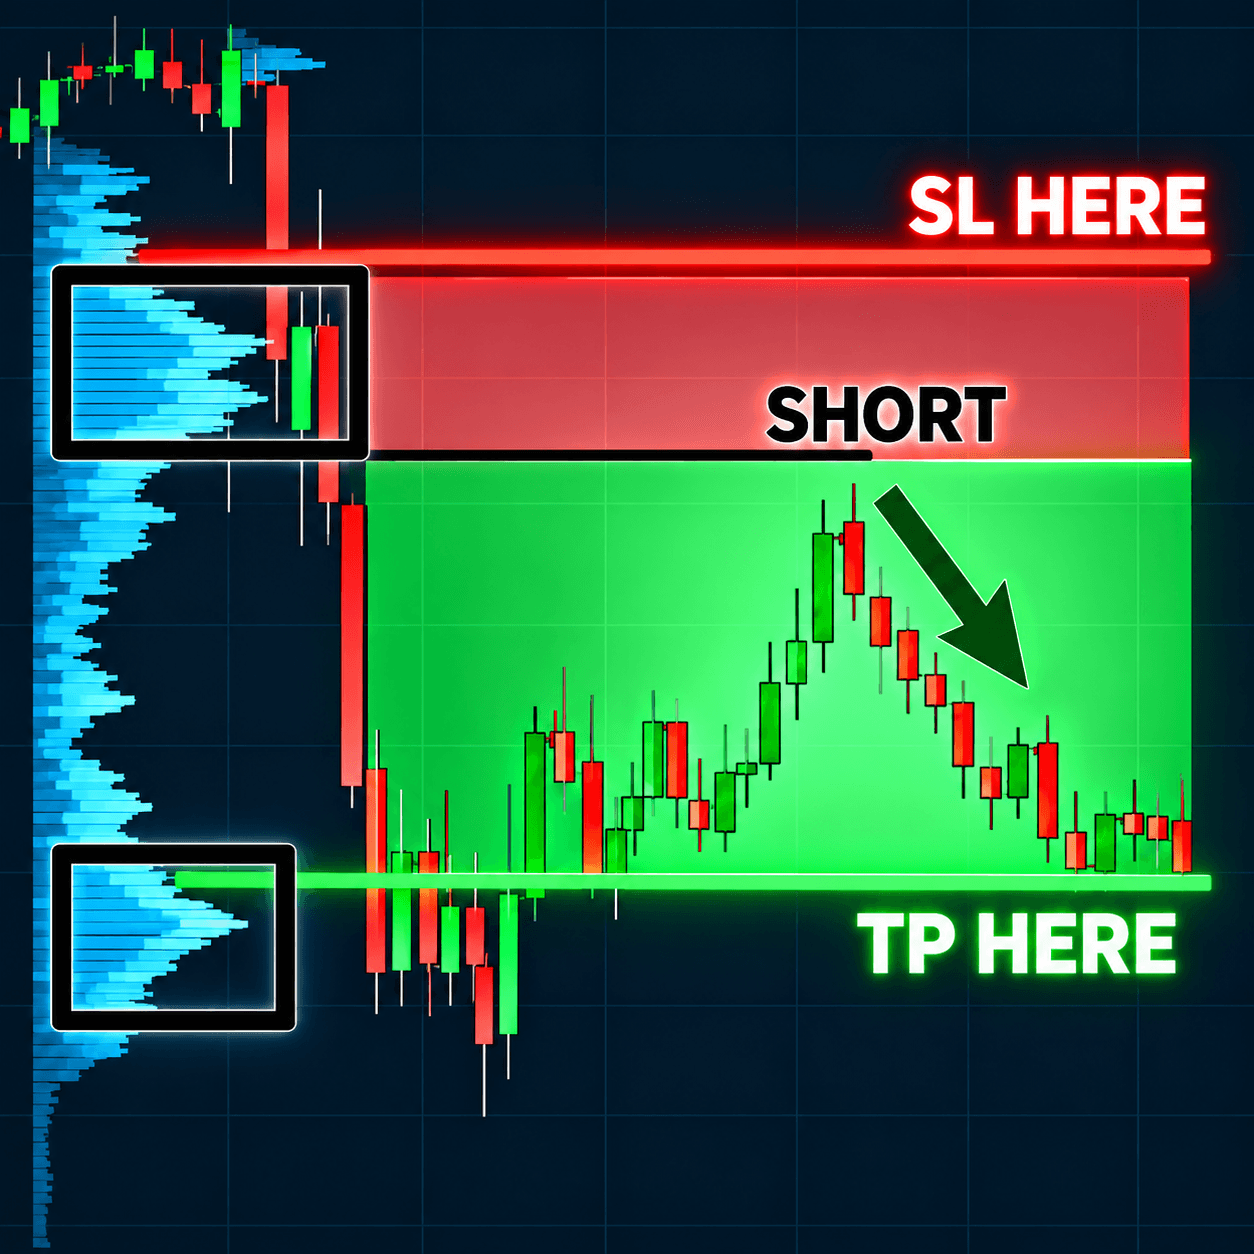
it clear. We have a Trend Setup with a Heavy Volume Zone in here. That means
that you wait for a pullback, and this is a resistance where you go short from.
And now you should think about where to place your take profit. And as we said,
you want to place the take profit at the beginning of a barrier, the barrier
being a Heavy Volume Zone.
So, you want to use the Flexible
Volume Profile to look into the area where the price made the pullback towards
that level you are trading, right? So, you look into this area and you want to
see how volumes were distributed there. In this case, the Volume Profile
reveals a Heavy Volume Zone in here. This one.
And you want to quit your short trade
before the price fully enters that barrier because the barrier could reverse
the price and completely ruin your trade, right? So, there’s that risk, and you
don’t want to risk it because you’ve already made your money here. So, the
logical thing to do here is just quit the trade at the beginning of the
barrier, which is here. This should be your take profit, right here at the
beginning of that Heavy Volume Zone.
Now, what counts as a barrier? In
most cases, it could be a Heavy Volume Zone, but it can also be a strong price
action level or a VWAP. But in most cases, for me, it is a Heavy Volume Zone.
And yeah, we already mentioned this: quit before the first barrier. If there
are multiple barriers on the way, then exit at the first one. It’s risky to try
to ride through it.
So, that’s the take-profit placement.
Take profit goes before a barrier.
Now, stop-loss placement. The main
rule is that the stop goes behind a barrier, at its far edge, because the
barrier protects you. It’s your shield.
So, we have the same example here,
and now I want to demonstrate how you want to place the stop. So, we have this
Trend Setup here, this Heavy Volume cluster. We have this pullback to this
level, short from there. Now we know that the take profit will be in here. And
let’s talk about the stop-loss placement.
As I mentioned, the stop needs to be
behind a barrier, and the barrier is this whole Heavy Volume Zone. So, if I do
a little drawing here, then this whole area is the barrier, and the stop should
go behind it, which is in here.
Now, what I like to do, if I get a
chance, if there is a little swing point close to the end of the barrier, I
actually place my stop there, like this. If there’s no little swing point like
this, then just place the stop at the far edge of the barrier and you should be
fine.
Now, what counts as a barrier? In
most cases, it’s going to be a Heavy Volume Zone. Now, an important thing to
mention here is that if the barrier fails, then the trade is over. There is not
really any point in hoping that the price will turn because the barrier is here
to protect you. If it fails, then who knows where the price will go? So,
there’s no need to risk more money if the barrier is breached. Quit your trade.
Now let me give you an example here,
and let’s talk about the stop loss and about the take profit as well. So, here
we have a Trend Setup again, daily chart. All those charts are daily charts.
Here is a significant volume cluster within the downtrend. So, you’ll be
looking to trade short from here, like this.
Now, the first thing that I’m always
interested in is where I place my stop. In this case, the barrier is that Heavy
Volume Zone here. So, this is the barrier. And you want to place the stop
behind the barrier. In this case, we also have this little swing point, so I
would place the stop in here.
Now, regarding the take profit, you
want to place it at the beginning of the first barrier standing in the way. So,
you want to look into this area to see how volumes were distributed there when
the price was reaching your short level, right? And you can see that there is
this volume cluster standing in the way, and the take profit should go before
the price fully reaches that Heavy Volume cluster.
So, the take profit should be in here
because there is a risk that the price might react to that Heavy Volume Zone
and just do this. In this case, yeah, it overshot the beginning of the Heavy
Volume Zone. So, theoretically, you could have taken the profit lower, but it’s
risky. The way I do it is I quit at the beginning of the volume cluster, or at
the beginning of the Heavy Volume Zone, which is in here, right?
So, stop loss goes behind a barrier,
take profit goes before a barrier. This is how this trade would ideally look.
Now let’s talk about another one.
Again, we have a Trend Setup. By the way, Trend Setup is the most common setup
you will see. So, that’s why most of the examples here are Trend Setups.
So, this is the trend, and this is a
significant volume cluster within the trend. So, you simply trade from the
beginning of it, or the way I would trade this, I would trade from the
beginning of this Fair
Value Gap. So, I would take the long from here, and regarding the stop, it
needs to be behind this barrier.
We also have this little swing point
here, so I would place the stop in here. So, it’s not only behind this Heavy
Volume barrier but also behind this little swing point. That adds something a
little extra to it, right? So, that’s the stop.
Now, regarding the take profit, you
want to see how the volumes are distributed in this area where the price was
going towards your support, and we have this volume cluster here. The way I
would place the take profit is at the beginning of the volume cluster, just to
make sure that the price won’t react there and my trade won’t be ruined. So,
this is the setting of this trade.
Now let me show you one last example
of this, and then we’ll move on. So, here we have a Volume Accumulation Setup.
We have this Heavy Volume Zone followed by this sell-off. So, I’ll mark this
resistance, and it is a short from there.
Now, regarding the stop loss, you
should consider this whole area as the barrier because this is where the heavy
volumes were traded, and you want to place the stop behind that. So, I would
place the stop in here.
Now, regarding the take profit, take
a look at this area. This is where the price was reaching towards our short
level. So, you want to see how volumes were distributed there. And here’s your
barrier, the first barrier standing in the way, and the beginning of it should
be your take profit. All right. And that’s how it’s done.
