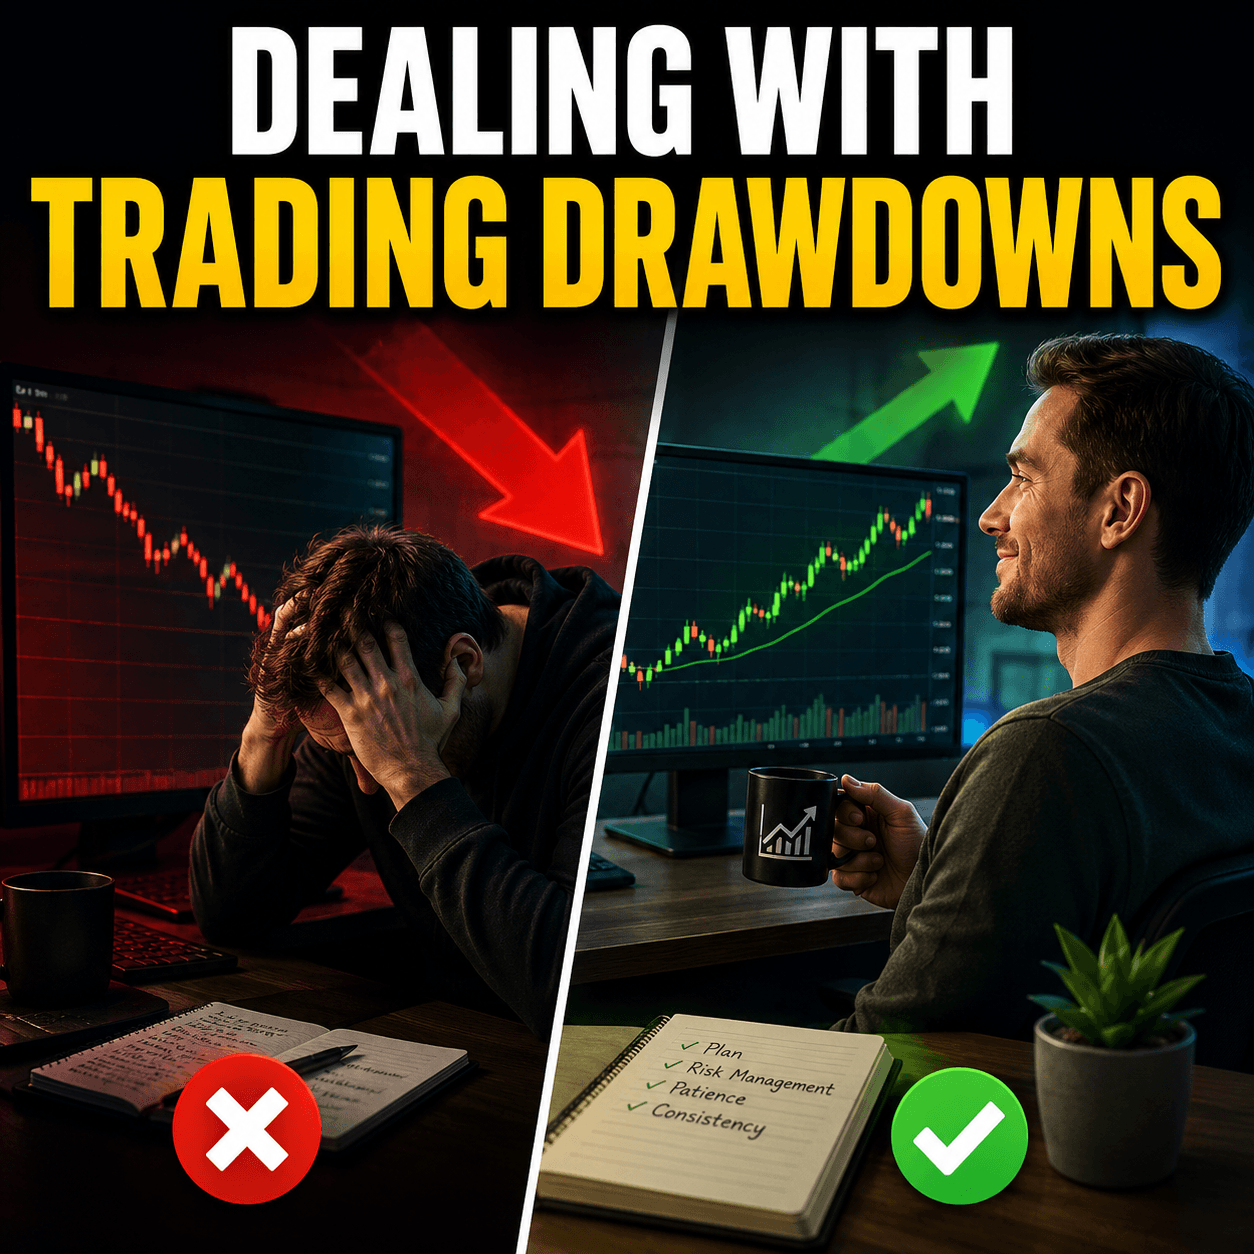
Every trader, at some point, will sit in front of their screen watching their account balance shrink, trade after trade going wrong. That feeling is a drawdown, and it is one of the most frustrating experiences in trading. The worst part is not even the money. It is not knowing what is broken or how to fix it.
Most traders respond to a drawdown in one of two ways. They either freeze up and stop trading entirely, or they panic and start changing everything at once — their strategy, their timeframes, their indicators, their risk. Neither approach works. In fact, both usually make things worse.
What actually works is a clear, structured plan. You need to identify the specific cause of your drawdown, fix it one step at a time, and trade through the recovery with discipline. That is exactly what this article will teach you.
Drawing from real trading account reviews and years of helping traders pinpoint their exact mistakes, this guide breaks down the two root causes of every drawdown and walks you through a practical, no-fluff process on how to get out of a trading drawdown and get your account moving in the right direction again. By the end of this article, you will know exactly where to start.
Table of Contents
5 Key Takeaways
1. Every drawdown has one of two causes — a risk management problem or a strategy problem. Find out which one you have before doing anything else. |
2. The most common risk mistake is inconsistent position sizing — fix this first because it is the easiest to correct. |
3. Trading correlated pairs simultaneously creates hidden, concentrated risk that can devastate your account in one session. |
4. Documenting every trade with a screenshot and short note is the only reliable way to find what is breaking your strategy. |
5. Fix one problem at a time. Trying to fix everything at once is what keeps most traders stuck in a drawdown longer than necessary. |
1. The Two Root Causes of Every Trading Drawdown
Before you can fix a drawdown, you need to understand what actually causes one. This is where most traders go wrong. They assume the market is against them, or they had bad luck, or their strategy stopped working. Sometimes that is true. But most of the time, the answer is much more specific and much more fixable.
There are exactly two reasons why a trader ends up in a drawdown.
The first reason is a risk and money management problem. This means the way you are sizing your trades, controlling your losses, or managing your overall account exposure is creating damage that compounds over time. The good news is that this type of drawdown is usually the fastest one to fix. Risk management mistakes are often straightforward once you can see them clearly.
The second reason is a trading strategy problem. This means something in how you select trades, place your levels, or manage your positions is consistently producing bad outcomes. This one takes a bit more work to diagnose, but it is absolutely fixable once you know where to look.
Why Applying the Wrong Fix Makes Things Worse
Here is something important to understand. Both causes can look identical from the outside. Your account is going down, your losses are piling up, and everything feels wrong. But the fix for a risk management problem is completely different from the fix for a strategy problem. If you apply the wrong solution, you will waste weeks without making any progress.
This is why the very first step is always to identify which type of problem you have. Everything else follows from there.
Type of Problem | Common Signs | How Long to Fix |
Risk Management | Losses are bigger than they should be, position sizes vary a lot | Days to weeks |
Strategy | Consistent wrong entries, stop-losses always getting hit | Weeks to months |
Both Combined | Deep drawdown, no clear pattern | Requires full review |
Think of it like a doctor diagnosing a patient before prescribing medicine. The diagnosis has to come first. Start here.

2. Is Your Drawdown a Risk Management Problem?
Risk management problems are the most common cause of trading drawdowns, and they are also the most fixable. Let us walk through each one clearly.
The Problem of Inconsistent Risk Per Trade
Imagine you are building a wall, but each brick you place is a different size. Some are huge, some are tiny, and you are just picking randomly. The wall will never be stable. That is exactly what happens to your trading account when you risk different amounts on each trade.
Many traders change their position size based on how confident they feel about a setup. A trade that looks really good gets 3% risk. A trade they are less sure about gets 0.5%. The problem is that market outcomes do not care about your confidence. That 3% trade can easily be the one that stops out, while the 0.5% trade would have been a winner. Over time, this inconsistency creates unpredictable swings that look like a strategy problem, but the real culprit is just inconsistent sizing.
The fix is simple: choose a fixed risk percentage and apply it to every single trade without exception. Most traders do well somewhere between 0.5% and 1% of their account per trade, depending on their strategy’s average win rate. Once you lock this in and stick to it, a major source of drawdown damage disappears immediately.
Why Oversizing a Single Trade Is So Dangerous
This one usually happens after a losing streak. The trader sees what looks like a perfect setup and decides to go bigger to make back the losses faster. This is one of the most dangerous moments in trading. A single oversized trade that goes wrong can erase days or weeks of careful work in one session.
Here is a straightforward way to think about it. If you risk 5% of your account on one trade and it loses, you now need a 5.26% gain just to get back to where you were. Lose 10% in one trade, and you need an 11.1% gain to recover. The math works against you the bigger the loss gets.
Single Trade Loss | Account Recovery Needed |
5% loss | 5.26% gain to recover |
10% loss | 11.1% gain to recover |
20% loss | 25% gain to recover |
50% loss | 100% gain to recover |
This table makes it very clear why keeping individual trade risk small is not just cautious. It is mathematically essential for long-term survival.
Setting a Maximum Total Exposure Limit
Even with consistent per-trade risk, if you have too many trades open at the same time, your total exposure can quietly become dangerous. Five trades open at 1% risk each means you are exposed to a potential 5% loss if everything goes wrong at once. During major news events or sudden market moves, that scenario happens more often than people expect.
Set a rule for yourself: a maximum total open risk at any one time. Three to five percent is a reasonable range for most traders. This acts as a second layer of protection on top of your per-trade risk rule.

3. How Correlated Trades Secretly Multiply Your Losses
This is one of the least talked about causes of drawdowns, especially for forex traders. Correlation risk is when you enter multiple trades that are linked to the same underlying movement. So instead of spreading your risk across different opportunities, you are actually concentrating it into one big directional bet without realising it.
A Simple Example of Correlation Risk
Here is a practical illustration. Say you enter three trades at the same time: long on EUR/USD, long on GBP/USD, and short on USD/CHF.
On the surface, this looks like three separate trades. But these pairs all react to the same thing: the strength or weakness of the US dollar. EUR/USD and GBP/USD move in the same direction when the dollar moves. USD/CHF moves in the opposite direction. So going long on EUR/USD and short on USD/CHF is essentially the same directional bet expressed twice through different currency pairs.
If the US dollar suddenly strengthens because of an unexpected news release or central bank statement, all three of your trades will move against you simultaneously. What looked like three separate positions becomes one concentrated loss multiplied by three.
How to Handle Correlated Trades
The solution is not to avoid all correlated pairs forever. Sometimes the strongest setups on any given day happen to be across correlated pairs, and passing on all of them would mean missing real opportunities. The solution is to adjust your position size when you recognise correlation.
A practical rule: when you are entering three or more positions that are correlated, cut your normal risk per trade in half. If your standard risk is 1% per trade, bring it down to 0.5% on each of those trades. This way, if all three move against you at the same time, the combined damage is equivalent to losing one or one-and-a-half normal trades, not three full-sized ones stacked on top of each other.
Over time, you will develop a feel for which pairs tend to move together. Until then, the table below will help.
Currency Pair | Positively Correlated With | Negatively Correlated With |
EUR/USD | GBP/USD, AUD/USD | USD/CHF, USD/JPY |
GBP/USD | EUR/USD, AUD/USD | USD/CHF, USD/JPY |
USD/JPY | USD/CHF, USD/CAD | EUR/USD, GBP/USD |
4. Is Your Drawdown a Strategy Problem?
Once you have confirmed that your risk management is solid and you are still losing, the problem is inside your strategy. This means something in how you are selecting trades, identifying levels, or managing positions is consistently producing bad results.
Why Strategy Problems Are Hard to Spot Without Evidence
Strategy problems are harder to spot than risk problems because they hide in the details of individual trades. From the outside, a strategy problem just looks like bad trades. But that label is not specific enough to fix anything. You need to get specific. You need evidence.
The only reliable way to find a strategy problem is to look at your own trades, not from memory, but from actual records. Memory is not trustworthy here. Traders consistently remember their wins more clearly than their losses, and they remember their losses as being unlucky or unavoidable rather than the result of a specific mistake. Hard evidence does not lie the way memory does.
Why Documentation Is Non-Negotiable
This is why documentation is not optional. It is the single most important habit that separates traders who recover from drawdowns quickly from traders who stay stuck in them for months. When you have a screenshot of every trade sitting in front of you, the patterns become obvious within a single review session. Without that documentation, you are essentially trying to solve a puzzle with half the pieces missing.
Think about it this way. If a doctor tried to diagnose a patient without any test results, no scans, no blood work, and just relied on what the patient remembered feeling last month, the diagnosis would be unreliable at best. Your trade screenshots are your test results. They are the objective record that makes a real diagnosis possible.
Start building this habit today, even if you are already in a drawdown. The trades you take from this point forward will become the data you need to identify what needs to change. The sooner you start documenting, the sooner the pattern becomes visible.

5. How to Review Your Trades and Spot the Pattern
Here is the exact process for turning your trade screenshots into a clear diagnosis.
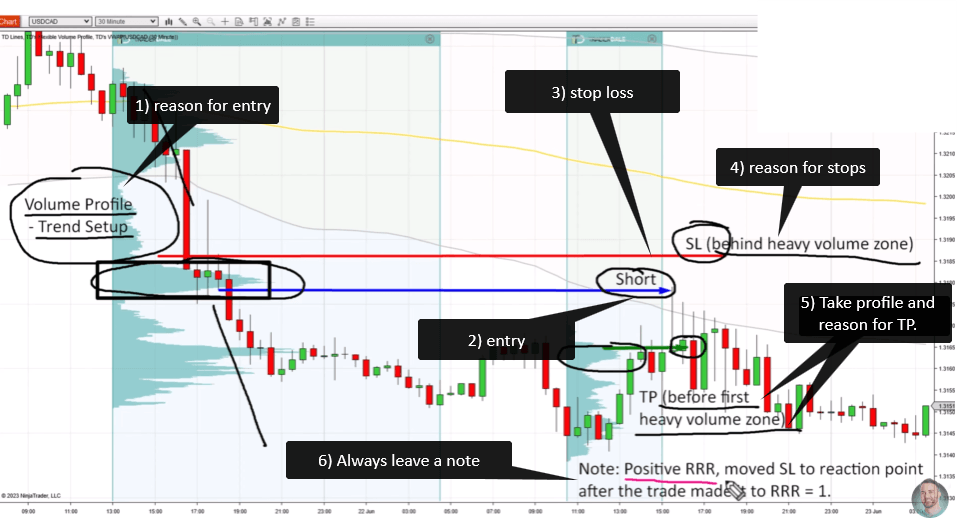
Step 1: Take a Screenshot After Every Trade
Right after a trade closes, win or lose, take a screenshot of the chart. Do this immediately while the context is still fresh. The screenshot should show the entry point, the stop-loss level, the take-profit level, and where price actually went after you entered.
Step 2: Write a Short Note for Each Screenshot
Attach a brief note to every screenshot. It should answer three questions. Why did you enter this trade and what was the setup? Why did you place the stop-loss and take-profit at those specific levels? How did you manage the trade while it was open?
This should take no longer than one minute. Keep it short. The goal is a quick, honest record, not a detailed essay.
Step 3: Review Your Drawdown Period Specifically
Pull up all the screenshots from the period when your losses started and go through them one by one. As you review each trade, use this two-sided checklist.
What to Look for (Positive) | What to Look for (Negative) |
Clean, logical entry reason | Entry at a weak or unclear level |
Stop-loss behind a real level | Stop-loss placed arbitrarily |
Realistic take-profit target | Take-profit too far or too close |
Trade managed according to plan | Moved stop-loss to avoid a loss |
Positive risk-reward ratio | Entered without a clear plan |
When you go through twenty or thirty screenshots in one sitting, you will almost always find one or two mistakes that show up repeatedly. That repetition is your diagnosis. That is what you fix first.
6. The Most Common Mistakes Found in Drawdown Periods
Based on reviewing real traders’ account statements and trade journals, these are the mistakes that appear most often during drawdown periods. Use this as your checklist when reviewing your own screenshots.
Trading Weak Levels
A weak level is a price area that looks significant on a small timeframe but has little importance on a higher timeframe. Trades taken at weak levels tend to get stopped out quickly because there is no real market participation defending that price area. The fix is to only trade levels that are clearly visible on higher timeframes and where price has shown a strong reaction before. If you have to zoom in very far to see the level, it is probably not worth trading.
Holding a Losing Trade Too Long
This happens when a trader refuses to accept a loss and either removes the stop-loss or simply watches the trade go deeper into the red while hoping for a reversal. The stop-loss you set at the moment of entry is your most objective risk decision, made before emotion takes over. Once you start moving it to avoid a loss, you have broken the logic of your system. Accept the small loss and move on to the next trade.
Bad Take-Profit and Stop-Loss Placement
A take-profit placed too far away never gets hit, turning potential winners into trades that reverse and stop out at breakeven or a loss. A take-profit placed too close leaves serious gains on the table and produces a poor overall risk-reward ratio over time. Take-profit should sit just before the next significant level, not at a round number and not at a dollar amount that simply feels comfortable.
A stop-loss placed too close gets knocked out by normal market movement before the trade has a chance to develop. A stop-loss placed too far away means you lose too much when you are wrong. The right approach is to place stop-losses behind a real structural level — a swing high, a swing low, or a significant volume zone — somewhere that genuinely invalidates your trade idea if price reaches it.
Entering Without a Plan
This is a reactive trade. Something moves, you feel the urge to get in, and you click buy or sell without a defined stop-loss, take-profit, or clear reason. These trades almost always end badly. A simple rule that works: if you cannot clearly explain why you are entering a trade in one sentence before you click, do not click.
7. The Right Mindset During a Drawdown Recovery
The technical fixes above will not work without the right mental approach. The way you think during a drawdown directly shapes the decisions you make, and poor decisions during a drawdown make it deeper and longer.
Fix One Thing at a Time
When traders go through their screenshots and find multiple problems, the natural response is to try fixing all of them at once. They change their entries, their stop-losses, their risk, and their timeframes all in the same week. The result is confusion. They can no longer tell which change caused which outcome, and the account keeps moving in the wrong direction.
Choose the single most significant problem from your review. Work on that one thing for a minimum of twenty to thirty trades. Evaluate the result. Then, and only then, move to the next issue. This feels slow but it is the most direct path to a genuine recovery.
Keep Your Review Balanced
When going through your trade screenshots, it is easy to focus entirely on the losses and bad decisions. Resist this urge. Deliberately look for what you did right in each session — a well-placed stop-loss, a clean entry, a disciplined exit. This is not about making yourself feel better. It is about maintaining the clarity and confidence needed to execute your plan correctly. Traders who constantly criticise every decision start second-guessing good trades, sizing down when they should not, and missing opportunities out of fear.
Reduce Your Size During Recovery
While you are working through your fixes, consider dropping your risk per trade to half your normal size. If you normally risk 1% per trade, trade at 0.5% during the recovery period. This reduces emotional pressure significantly, gives you more room to test adjustments, and limits further damage if the fixes take a few weeks to show results. Once you are back to consistent positive performance, gradually scale back up.
Recovery Stage | Recommended Risk Per Trade |
Active drawdown, problem not yet identified | 0.25% to 0.5% |
Problem identified, testing fixes | 0.5% |
Fixes working, returning to consistency | 0.75% |
Fully recovered, back to normal trading | Full standard risk |
This gradual scaling approach keeps you in the game while you work through the recovery process without risking further serious damage to your account.
Conclusion
A trading drawdown is not the end of your trading journey. It is a signal, specific and fixable, that something in your approach needs attention. The traders who recover fastest are not the ones with the best instincts or the most screen time. They are the ones with a clear process for identifying what went wrong and the discipline to fix it one step at a time.
Start with your risk management. Make sure you are risking the same amount on every trade, that you are not oversizing single positions, and that you are not unknowingly stacking correlated trades on top of each other. If your risk management is already solid, move into your trade screenshots. Go through your drawdown period carefully, look for the recurring mistakes, and isolate the single biggest problem to work on first.
Reduce your position size during the recovery period. Keep your review balanced and honest, not just focused on losses. Give each fix enough time to show results before moving to the next one. And above all else, trust the process. Drawdowns that feel endless are almost always the result of not having a structured plan to get out of them. Now you have one. Use it.
Frequently Asked Questions
How many trades should I review before concluding what my strategy problem is?
Reviewing at least twenty to thirty trades from your drawdown period gives you a large enough sample to identify genuine patterns rather than one-off mistakes. Fewer than that and you risk drawing conclusions from too small a set of data.
Should I completely stop trading while I am in a drawdown?
A short break of two to three days can help reset your mental state, especially after a sharp losing streak. But stopping entirely without fixing the underlying problem means you will return to the same mistakes. A better approach is to halve your position size, keep trading, and use that time to review and adjust.
What is a realistic timeframe to recover from a drawdown?
A risk management problem that you identify and fix quickly can show results within two to four weeks of consistent trading. A strategy problem that requires a full review and adjustment process may take one to three months. The key variable is not time. It is how quickly you accurately identify the root cause and commit to addressing it systematically.
Most Traders Read This and Do Nothing. Will You?
The difference between a trader who escapes a drawdown and one who stays stuck in it is not knowledge — it is action. You now know the two root causes, how to review your trades, and how to fix the right problem in the right order. The next move is yours. Visit trader-dale.com to access the full Volume Profile trading course and custom tools built to help you trade with structure and consistency, starting from your very next session.