
If you’ve been using VWAP or Volume Profile in isolation and wondering why you keep getting false signals — this is the article you need. I spent years trading each tool separately before I realised the real edge isn’t in either one on its own. It’s in the combination.
In this guide, I’ll show you how I use VWAP and Volume Profile together to find what I call “Combo” levels — zones where multiple independent technical reasons stack up at the same price. These are the setups I trust most after 16 years of professional trading, because they don’t rely on a single indicator being right. They require several things to agree simultaneously.
Table of Contents
The 5-Point "Cheat Sheet"
- Never trade a single indicator: One VWAP touch is a low-probability gamble. A “Combo” — where VWAP, Volume Profile, and price action all align — is a high-probability trade.
- VWAP is the institutional benchmark: Large algorithmic systems are programmed to execute at or near VWAP. When price returns to VWAP, institutions are re-evaluating — that’s your opportunity.
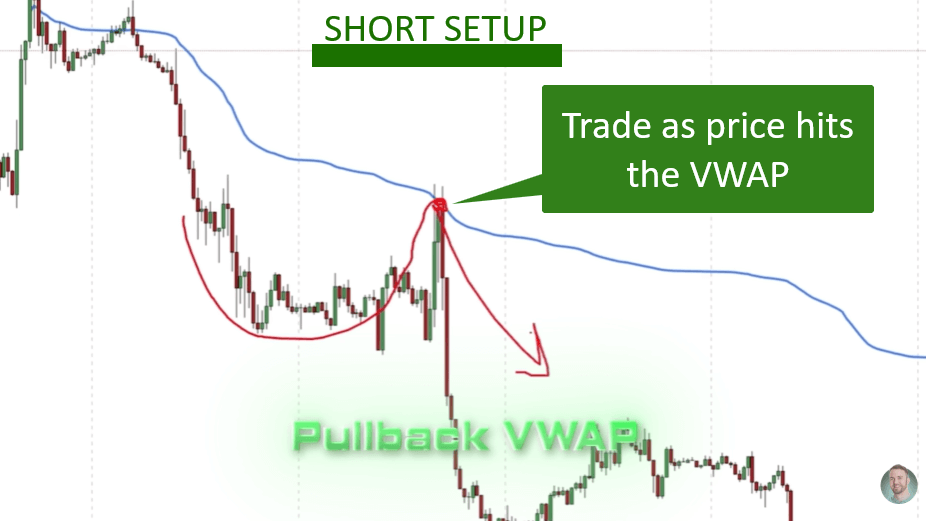
- The Pullback Rule: I look for shorts when price pulls back up to VWAP, and longs when it pulls back down to VWAP. Trading with the trend, not against it.
- Volume clusters are physical barriers: High Volume Nodes from the Volume Profile act as support and resistance because that’s where the most money changed hands.
- Enter at the First Barrier: Don’t wait for the perfect centre of a zone. Enter at the edge. You’ll get better fills and won’t miss moves by being a perfectionist.
The Psychology of VWAP: Why Institutions Love It
VWAP stands for Volume Weighted Average Price. Unlike a standard moving average that only considers time, VWAP weights price by the volume traded at each level. The result is the true average price paid across all participants throughout the day.
Large institutional algorithms are built around VWAP. When a bank needs to buy or sell thousands of contracts, they benchmark against it — they want to execute at VWAP or better, not at the extremes. This means that when price drifts away from VWAP, institutions have a programmatic reason to bring it back. That returning to VWAP is what creates the trade opportunity for you.
The key mindset shift: when you see price return to the VWAP line, you’re seeing large players resetting their positions — not random noise. That’s why VWAP bounces are so consistent when combined with other confirming factors.
Finding "Fair Value" (Stop Chasing the Market!)
The most common mistake I see traders make is chasing price — buying at the top of a big green candle or shorting at the bottom of a red one. That’s buying at the Daily High or selling at the Daily Low. The opposite of fair value.
My approach is the pullback: wait for price to return to the VWAP line before entering. In a downtrend, I look for price to rally back up to VWAP before shorting — I’m entering at the same average price the big sellers are benchmarking against. In an uptrend, I wait for price to dip back to VWAP before buying — a discount entry at institutional fair value.
This pullback discipline alone keeps you out of a huge percentage of bad trades. If you’re entering when price is extended far from VWAP, you’re not trading fair value — you’re chasing.

The "Combo" Philosophy: Why 1+1=3 in Trading
VWAP alone will fail you. I know because I traded it alone for a period and couldn’t understand why the signals were inconsistent. Price would slice right through the VWAP like it wasn’t there. The answer is simple: the market needs more than one reason to stop at a level.
A “Combo” is a price zone where multiple independent factors overlap. When VWAP, a Volume Profile high-volume node, and a previous price action level all sit at the same price, you have three separate reasons for the market to react there. The probability of a reversal or bounce is dramatically higher than any one factor alone.
In my experience, 80–90% of my best trades come from exactly these kinds of confluent zones. The three pillars I look for:
- VWAP or Anchored VWAP: The mathematical fair value benchmark.
- Volume Profile cluster: The physical zone of concentrated trading activity — where the most money changed hands.
- Price Action level: Previous support, resistance, swing high, or swing low — the historical memory of the market.
When all three align, you’re not guessing. You’re standing on a fortress.
The Price Action Combo: Turning Support into Power
Let me give you a concrete example using the S&P 500 on a 5-minute chart. Price has been trending down all morning — well below the VWAP. It starts to rally. Most traders see this and think the trend is reversing. They start looking for longs.
I look left on the chart. I see a level that acted as support earlier in the session — a floor that price bounced off three times. When that floor eventually broke, it flipped into resistance. Now, as price rallies back up, it’s heading toward that same level. And that level just happens to be sitting right at the daily VWAP.
That’s a Double Combo: price action resistance and VWAP fair value, both at the same price. Two independent reasons for price to stall and reverse. I short there with tight risk because I have two confirming factors working in my favour simultaneously.

The Triple Threat: VWAP, Volume Profile, and Swing Levels
The strongest setup I use is the Triple Combo: Anchored VWAP + Volume Profile High Volume Node + Swing High/Low all at the same price. I use this approach on high-volatility assets like Bitcoin, NQ futures, and individual stocks.
Instead of the daily VWAP, I use an Anchored VWAP — anchored to the start of a major trend or a significant news event. This gives you the fair value for that specific move, rather than just today’s session average.
I combine it with High Volume Nodes from the Volume Profile — the “bellies” on the profile where the most trading occurred during a previous consolidation. These zones act as powerful magnets and barriers because there’s institutional size sitting there.
When the Anchored VWAP, a High Volume Node, and a previous swing high all sit at the same price level, I call that a Triple Combo. When price pulls back to that zone, the probability of a reaction is as high as it gets. The entry is at the first edge of the zone — the “First Barrier” — not waiting for a precise tick at the centre. Better to be filled and positioned than to miss the move chasing perfection.

The Gap Strategy: Using Anchored VWAP for Stocks
If you trade stocks, gaps are one of the most powerful setups for Anchored VWAP. A gap creates a void where no trading occurred — the market jumped from one price to another overnight. These gaps often get “filled” as price returns to the pre-gap level, and Anchored VWAP tells you exactly where institutional fair value sits for that gap move.
My approach: anchor the first VWAP to the low of the current trend, and anchor a second VWAP to the first candle after the gap. Where these two lines converge — especially if a Volume Profile cluster sits at the same level — you have a Dynamic Support Zone. It’s dynamic because it’s built from two different anchoring points and a volume cluster simultaneously.
When these elements align, the probability of a successful long trade is very high. You’re buying where the gap-up momentum originally began, at institutional fair value, backed by volume structure. That’s three reasons in your favour before you’ve even placed the trade.

Interactive Checklist for Your Next Trade
Before I take any trade, I run through a quick mental checklist. If I can’t answer “yes” to at least three of these, I stay out:
- Is price currently at or near the VWAP (fair value)?
- Does the Volume Profile show a high-volume cluster at this level?
- Is there a price action reason — previous support, resistance, or swing level — nearby?
- Am I trading with the trend? (Price below VWAP for shorts, above VWAP for longs)
- Have I identified the First Barrier — the edge of the zone where I’ll enter?
Three or more “yes” answers means I have a genuine Combo. Fewer than three means I’m forcing a trade on weak evidence. Staying disciplined on this checklist is the single biggest factor in keeping losing trades out of my results.
Summary Table: Combo Components Comparison
Here’s how the strategy scales from basic to expert level:
- Basic — VWAP only: Useful for scalping quick bounces, but low reliability on its own. Price slices through VWAP regularly without a second confirming factor.
- Advanced — VWAP + Price Action: Much higher reliability. A VWAP bounce at a known support/resistance level gives you two independent reasons for the reaction. Good for day trading major indices.
- Expert — VWAP + Volume Profile + Price Action (Triple Combo): The highest-probability setup. Three independent confirming factors at one price. My go-to for swing trades, crypto, and high-volatility futures.
You don’t need to use all three every time. The point is to stack as many independent reasons as possible before clicking the button. One reason is a gamble. Three reasons is a trade.
FAQ: Common Trading Hurdles
These are the questions I get asked most often about the VWAP and Volume Profile Combo approach:
Conclusion: Your Path to Consistency
Trading isn’t about being right all the time. It’s about having a repeatable framework that puts the odds in your favour — and walking away from trades that don’t meet your criteria. The Combo approach gives you both: a clear reason to enter and a clear reason to stay out.
Start simple. Find one VWAP touch at a Volume Profile cluster. Mark it. Watch it. See how price reacts. Once you’ve seen it work a few times, it becomes second nature to spot these levels before the market gets there.
If you want to go deeper on how I combine Volume Profile and institutional order flow into a complete trading system, that’s exactly what I cover in my trading course and tools. And if you’re looking to apply these skills in a prop firm environment, the Funded Trader Academy is the structured path I’ve built for exactly that.
Don’t trade. This is exactly the discipline that separates consistent traders from gamblers. If the VWAP is at one price and the nearest Volume Profile cluster is 10 points away, there is no Combo — there’s just a single indicator. Wait for the market to give you a level where both factors converge. These setups happen daily on any liquid instrument. Patience here is not optional; it’s the strategy.
Yes, and the logic is identical across timeframes — only the VWAP type changes. For day trading, use the standard Daily VWAP that resets each session. For swing trading over several days or weeks, use the Anchored VWAP anchored to the start of the trend or a significant pivot point. The Volume Profile and price action layers work the same way regardless of timeframe.
I prefer the Fixed Range Volume Profile for identifying specific combo zones. You select the range of the rotation or trend you want to analyse, and it shows you exactly where the volume clustered within that move. The Visible Range Profile (VRVP) is also useful for a broader view of the current chart. Avoid session-only profiles for swing-level analysis — they miss the bigger volume structures that define key levels.
A level has failed when price closes through it with strong momentum rather than just touching and reversing. A wick touch and bounce is normal. A full candle close beyond the level — especially on increasing volume — means the level has been broken and you should exit or reverse. I also use Cumulative Delta as a secondary check: if Delta is confirming the break (falling sharply as price breaks below a support combo), the level is genuinely failing, not being hunted.
VWAP works well on currency futures (6E, 6A, 6B on the CME) because they have centralised volume data and real session opens. For spot Forex, VWAP is less reliable because there’s no central exchange and no true session volume. Volume Profile on spot Forex uses tick volume rather than actual contract data, which reduces accuracy. If you want to trade currencies with this approach at full effectiveness, currency futures are the better instrument.
Quality over quantity — always. On a typical trading session I’m looking for one or two genuinely clean combo setups, not five or six mediocre ones. A clean setup means the VWAP level (first deviation or central line) and the Volume Profile node overlap at the same price, the level has clear historical context, and the market environment supports the trade direction. If you find yourself taking four or five combos a day, you’re probably lowering your standards to find trades. The best combo setups are obvious when they appear — you don’t have to squint at the chart to convince yourself they’re there.
I use limit orders placed directly at the combo level rather than waiting for candle confirmation — because by the time a reversal candle forms, you’ve often missed the best entry or your risk increases significantly. The combo level itself is the confirmation: VWAP and Volume Profile both pointing to the same zone is enough justification to have a limit order waiting there. If you’re not comfortable with limit orders, a close above/below the level on the timeframe you’re trading is the minimum candle confirmation to look for. But limit orders at pre-identified combo levels give cleaner risk-to-reward and are how I personally trade them.
Hello, INNOVATIONS ANALYST delivered everything they promised. I have been able to refinance my house, buy a new car. They fully recovered my stolen crypto of 195,000 USD, I never thought it was possible. If you have been scammed of your hard earned money send a mail to them at ( INNOVATIONSANALYST at GMAILCOM ) , I have referred many friends and even a few family members to their service and they’ve all come back with positive feedbacks to thank me!
INNOVATIONS ANALYST delivered everything they promised. I have been able to refinance my house, buy a new car. They fully recovered my stolen crypto, I never thought it was possible. If you have been scammed of your hard earned money send a mail to them at ( INNOVATIONSANALYST via GMAILCOM ) , I have referred many friends and even a few family members to their service and they’ve all come back with positive feedbacks to thank me!