
In this article, I’m going to break down exactly how I trade my levels so you can start putting the rules to use in your trading. Some of the rules require a bit of practice, but the details below will point you in the right direction. Here we go!
How I Enter My Trades
Some time ago I used to enter only with market orders. When the price got near my level, I switched to one minute chart and watched the dynamics and behavior of the market. My goal was to get a slightly better entry than with a simple limit entry. Now I use both market and limit orders because limit orders are much more convenient than market orders for certain situations. Currently, my ratio between using market and limit orders is around 50/50.
Situations when I prefer MARKET order are:
- Entering a position against a strong spike move. The reason for this is that you can quickly abort the trade if it moves too quickly into the level and triggers the rules in the course for avoiding fast spikes into a level. If there is strong news causing the spike, I don’t enter the position. If the spike is not news driven, I will enter it. The fastest way to see if the spike is news driven or not is via a service like Forex squawk. A slightly delayed version is ForexFactory. Quick spikes can allow you to enter for a slightly better price if they shoot a bit past the trading level. I provided an example of this below (1-minute chart). In this particular case, I was able to enter at an entry 6 pips better than the original level.

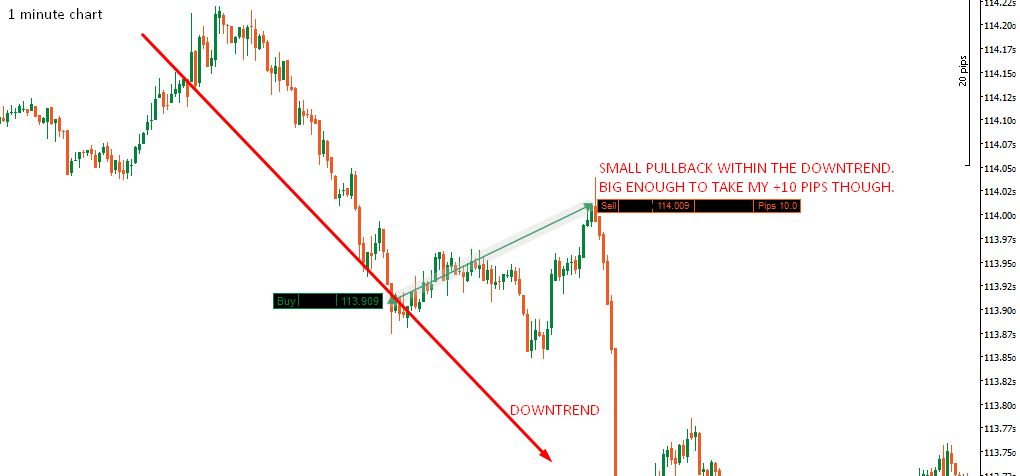
- Price rotates close to the level creating weak highs/lows. After such rotation (that I watch on 1-minute chart) there is likely to be a small spike move followed by a quick rejection (if the level works). The idea is to enter during the actual spike to achieve a better entry. Here is an example of a trade I took using this method:
Where to Place Your Stop Loss & Take Profit
My profit target is 10 pips, and my stop loss is 12 pips. I use this setting for all four major pairs that I trade intraday (EUR/USD, AUD/USD, USD/CAD, USDJPY). The reasons for this settings are:
- I like to be out of my trades quickly because the more you have your trade open, the higher the risk of something unexpected happening. It could be a change of market sentiment or some other market-moving event like unexpected (or expected) news.
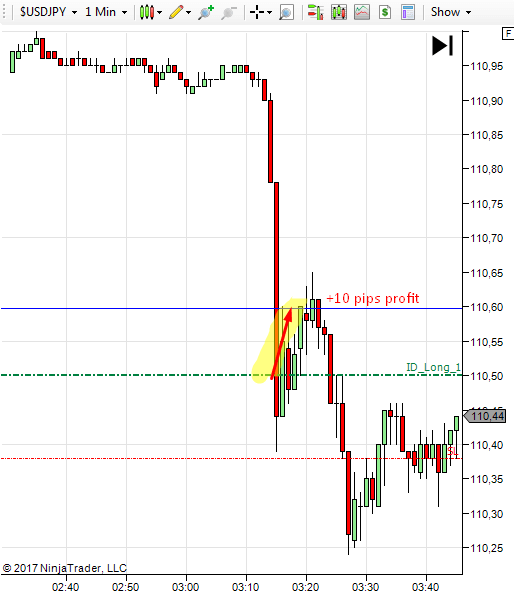
- Another reason is that even if my trading level happens to be against a strong counter-trend move, a 10 pip correction is much more likely to occur than a 20 pip reaction (which would basically be the end of that short-term trend). Today’s long on the USD/JPY shows that perfectly:

- 10 pip reaction is from my experience adequate reaction to intraday levels that I create and trade. Sometimes there is a much bigger reaction, but 10 pip reactions happen very often. This reward to risk ratio allows me to maintain a 70 % strike rate as an average over the long term.
- I prefer to have Reward to Risk Ratio of close to 1:1. Having a small Reward to Risk ratio (losers are much bigger than winners) would mean devastating losses that are hard to come back from. On the other hand, having a very large Reward to Risk ratio (winners are much bigger than losers) means having a reduced strike rate. Also, there is the risk that you take all the losing trades and by mistake miss the one winner that would cover them all. This is Murphy’s law, and it works in trading more than anywhere else :).
Some of the members of my trading course did their own research and came up with quite different SL/PT setting. For example, Ziggy’s research shows that the best stop loss and take profit location would be achieved around the 20/20 mark. I can only say that this really is mostly about preference. 10/12 works for me and I am happy to trade that way. Other people might prefer something close to the 20/20 method. In my opinion, it is much more about YOUR consistent application of your trade management ruleset, than the specific stop and take profit size itself.
Trailing Your Stop Loss
The way that I protect profitable positions is rather straightforward and simple, as I believe this is the key to being able to repeat the rules of your trading plan consistently. I secure my position by moving my stop loss to the reaction point when I’m roughly 7 – 8 pips in profit. This is what I call a neutral trade management style.
I also adapt securing my position to the current market behaviour. It is a bit detailed but I want to give you the full description of how I do things, so here it is:
- If I trade against a strong trend I am much more careful and I secure my position in a more conservative way. Generally speaking, I secure my position when I am 7 pips in open profit. The reason is that it is quite dangerous to go against a trend and it usually pays off to be really careful and secure your position soon.
- If I trade in a direction of a trend I can be more aggressive with moving of my SL. In this case I usually move my SL when my open profit us around +7.5 to +8 pips.
- When there is no apparent trend I usually secure my position when it is +7.5 pips in open profit.
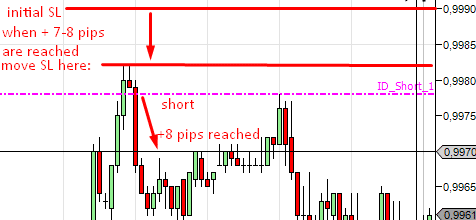
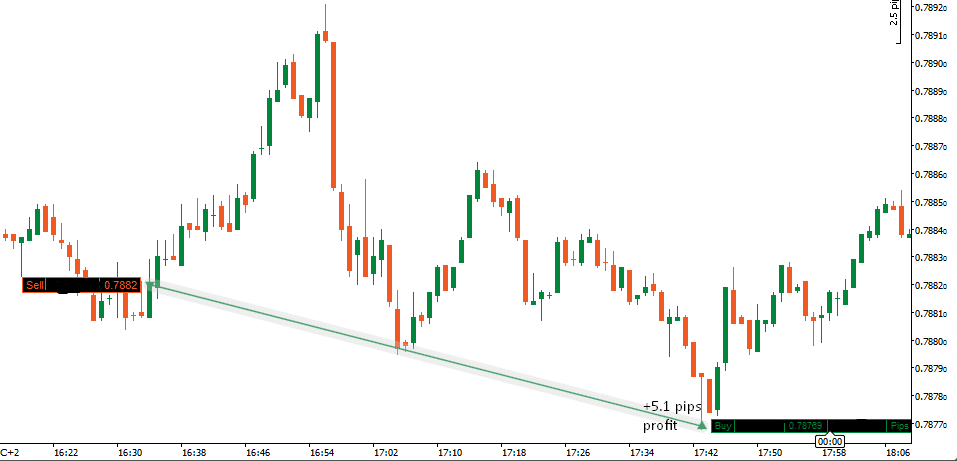
- If there is a really sharp and precise reaction – for example 5 pips reaction exactly at my level within the first 1-2 minutes, I usually secure my position sooner (when +7 pips in open profit). The reason is that this sharp reaction shows me that this is the reaction I was waiting for and the aggressive buyers/sellers that I wanted to see there really are there and now they made themselves apparent. If the price should go back to the reaction point of this strong rejection it would mean that the counter move is too strong and that my position most likely won’t end up in a profit – so for that reason I secure my position this way. Generally speaking – if strong reaction point gets breached – the counter move is too strong and you better quit your trade. Check out this illustration of strong reaction at 1.2715 short level:

Tested Levels
If the price comes close to a level and makes a strong reaction I consider the level already “tested” and I discard it. Like many aspects of trading that cannot be made 100% mechanical, determining whether or not a level is tested will take some time and practice. This is where have the help of the member’s forum is also a huge benefit as you’re able to go over trades as a group. For the sake of this article though, let’s go through some key points to determining whether or not a level is already tested.
1.) How far the price turned from the level and how big the reaction was: Usually if the price comes 0-3 pips close to the level and makes an 8 or more pip reaction then I discard it. There are times though when the level we’re looking to trade from is rather significant but we get a test of the level that is right on the border of being invalid. If the level is substantial though, I’m likely to still use it. This is where seeing the daily level commentary each day is super beneficial as you’re able to get a break down every time a situation like this occurs.
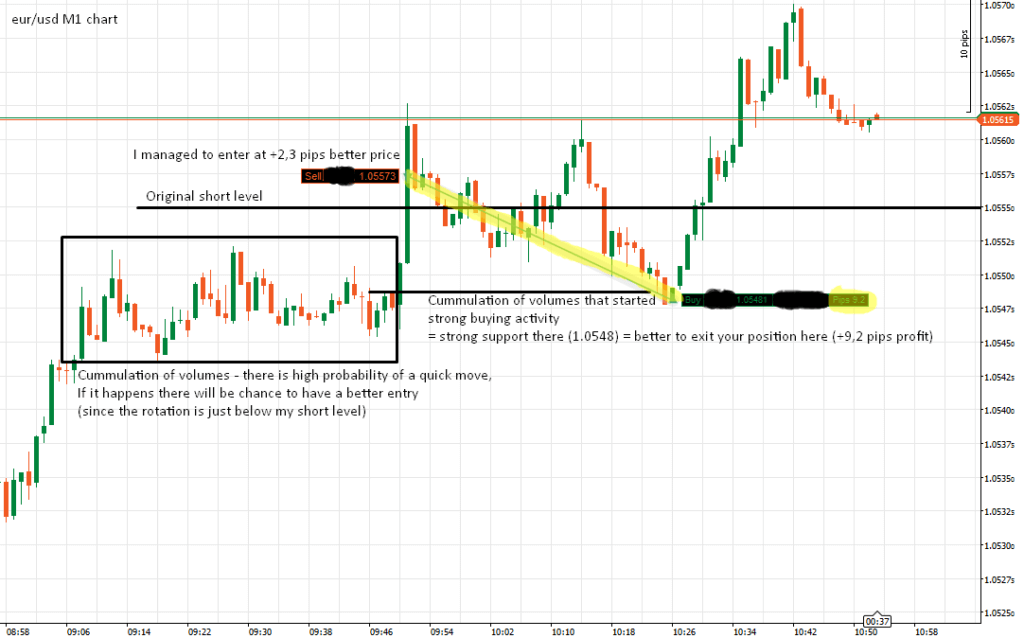
2.) What the level looks like: If the support/resistance area is a wider zone where the exact level isn’t that easy to pinpoint, it is generally safer not to take that level again if it was previously tested. For example, if the price turned 4 pips prior to reaching your level in the middle of wider support/resistance zone, it is better to discard the level because the price already tested the zone. If the zone isn’t too wide and you are able to pinpoint the exact support/resistance level, then you can be more aggressive and still take trades that didn’t quite make the level. To see if the support/resistance zone is wide or tight, check the volume profile of this area. If the volume cluster is narrow/tight, then the support/resistance zone is also tight. If the volume area is wide, then the support/resistance is also going to be wide. Check out the screenshot of a trade I took on the EUR/USD. There was a mediocre “test” when the price came close to the level and then made a strong and significant reaction away. However, the resistance zone was quite narrow and the volumes that I considered to be strong resistance still weren’t tested. For that reason, I decided not to discard that level and we took the trade:
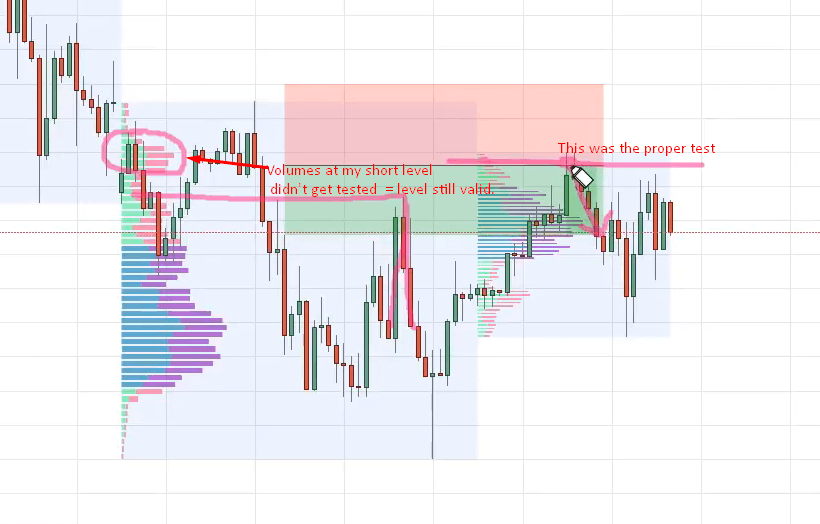
3.) The strength of the reaction: If the price turns before the level slowly and without any energy or volatility, then I’m more inclined to still consider the level valid. If there is a sharp and swift reaction then I’m more careful about taking the trade on a future test.
4.) Trend/counter-trend: I’m more aggressive and benevolent when I trade pullbacks in the direction of a trend than when I have an older level that goes against a current trend. In other words, if I have a short level in a downtrend I’m more likely to trade it, even if it was tested 3 pips sooner and made an 8 pip rejection. If on the other hand the reaction it was for a counter-trend trade, I would most likely discard this level because of the greater risk.,
5.) Your own discretion: Like it or not, sometimes you need to make the decision based on what you think will happen. Having many hard rules is definitely a good thing but in some cases, you cannot rely solely on these. This is why trading is an extremely difficult skill to master, as all profitable trading strategies will require some level of discretion.
I need to add that I only use this tested/not tested approach when I am at the computer, which for me is during European and New York trading session. I don’t use it for the Asian session. During the Asian session, I prefer to use simple limit orders as the market is often much calmer and there aren’t as many macroeconomic events.
As a final point on this topic, my trading levels work even if you remove the tested/non-tested criteria from the level selection process. Especially for those still in the process of learning to trade, it is less stressful and less time-consuming. If you are new to trading, I would recommend using simple limit orders on all your trades and only consider whether a level is tested or not AFTER you are doing well with trading limit orders on all valid levels. Learning to trade forex successfully is much more about YOUR consistent application of the rule set, rather than a few small tweaks to the rule set itself.
Trading Macroeconomic News
I never* trade during, before, and immediately after the release of any strong macroeconomic news (news marked in red on ForexFactory). I usually don’t open a trade 15 or fewer minutes before the release either.
Still, there are some discretionary situations that need to be covered. For example when to close the position before the news, when it is okay to start trading after the release, or when it is possible to re-enter your position after the news volatility passes. Let’s have a look at those points one by one:
1.) Quitting a trade before the news: I prefer to quit my trades around 2-5 minutes before the release. I usually watch the 1-minute chart to see what is going on with the smaller perspective. For example, if I see that there is a channel on 1-minute chart, I try to end the trade at the extreme of the channel. In this case, it is not likely that the market will shoot out of the channel before the release. By closing in this manner, I can make the best of the situation I’m given. Sure you can wait and pray, but remember, time is running out so it’s best to take the first logical exit.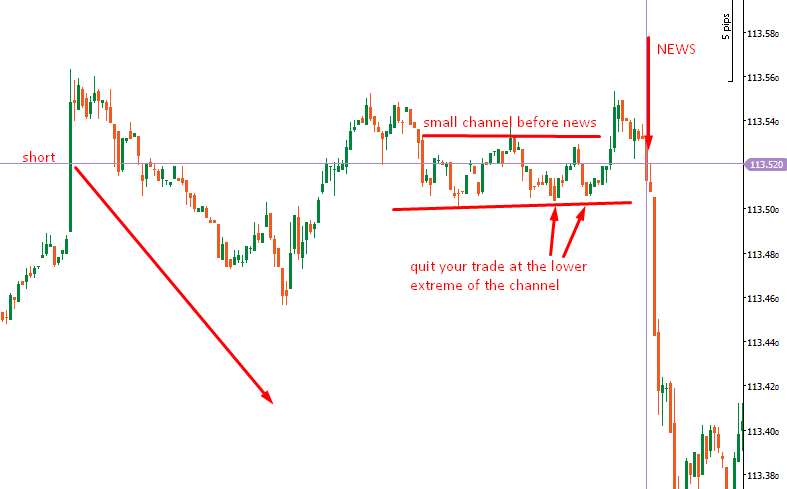 Another example is when the price action doesn’t slow down into a small channel. In this case, I try to exit my position at the closest resistance that I can see on the 1-minute chart. This resistance is usually some type of price rotation (= small volume accumulation area) from which some buying or selling activity started.
It could look like this for example: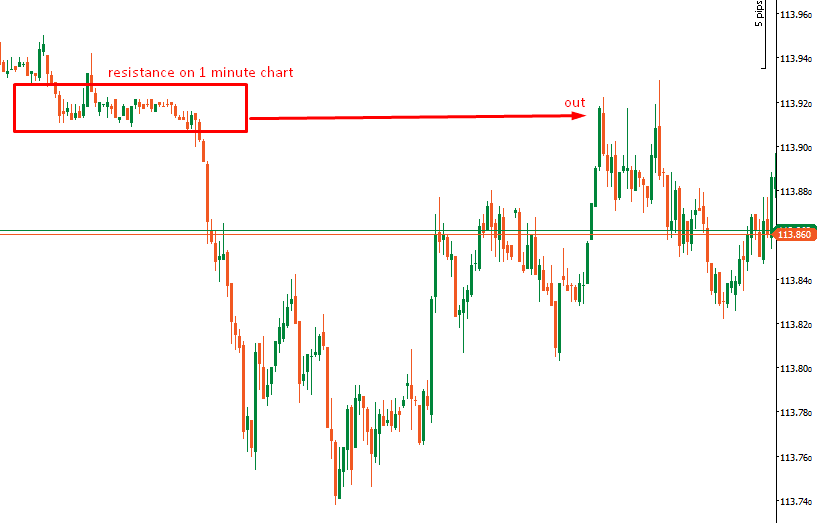 Remember – I close my positions like this only when there is an upcoming macroeconomic news event. In other cases, I stick to my 10/12 PT/SL method.
2.) Entering positions after the news release: In this case, it is the volatility that matters most, not the time. Because of that, I cannot give an exact time we must wait after news before entering a position. Strong macro news like CPI, GDP, and NFP can start new trends and I don’t want to enter my positions counter that trend. So when there is a strong macro event and it is followed by strong volatility and aggressive buying or selling activity (price moves rapidly in one direction), I am usually really careful and prefer to not enter any trades that would go against the move. There are also weaker pieces of (but still red) news, for example, consumer confidence, housing permits, oil inventories, and trade balance to name a few. After news releases like these, I just wait a bit until the spreads are back to normal and the dust settles down. Then I am willing and ready to trade again. This can happen within just a few short minutes. There are also special “red” news events that can cause extreme volatility. If there is such news I usually don’t trade the whole trading session and sometimes not even the next session. This would include news concerning central bank policy (FOMC, ECB, RBA, BOC and other central bank rate decision news). If you aren’t sure what volatility to expect from a certain macro event, go to this webpage and have a look at historical volatility that this particular macro caused in the past: NEWS IMPACT TOOL.
3.) Re-entering a trade: If I quit a trade before news and the news doesn’t cause a significant enough spike to have hit SL or PT, I try to re-enter the position if I get a chance to enter at the same or better price as before. I only re-enter if the volatility has settled down and if the price didn’t go near the profit target (let’s say around 75% or more). I also re-enter only when I still believe it could be a profit. How do I determine this? As an example if I have a level I’m looking to get long from, I want to see a sharp and fast rejection of lower prices (1-minute chart) if I am going to enter my position again. If there is just a weak low and the price only slowly rotates at the reaction point, I am usually a bit hesitant to re-enter and I may not re-enter it at all. In the two pictures below, you can see a short trade that I quit before the news and re-entered it after it. You can also see the sharp rejection of higher prices that assured me to re-enter the trade.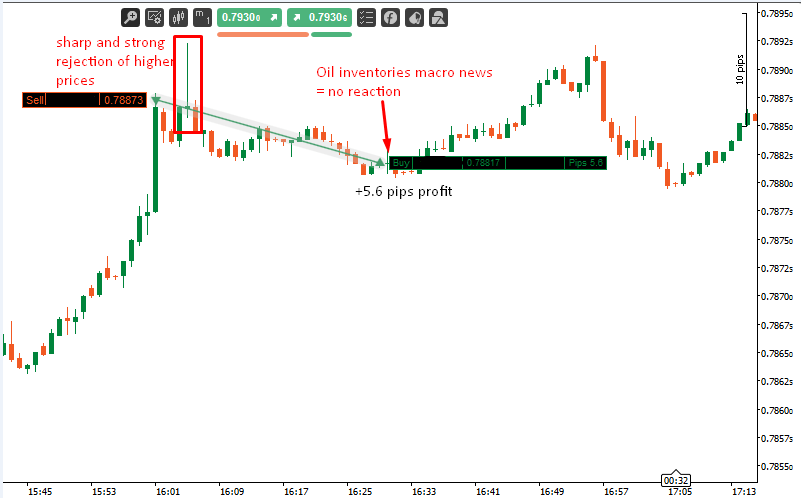
*Some news that is marked “red” (significant) isn’t really that significant. For example, Unemployment Claims. I don’t have a problem with trading through “Red” events like this that never move the market more than a few pips. Still, if you are not completely sure about the impact of some “red” news, then I would suggest that you don’t trade during it. It is better to be safe than sorry.
How Long Should You Hold A Position?
If there isn’t any upcoming macro news, I hold my position until I get full profit or a loss. It doesn’t matter if it takes hours, I just wait in the vast majority of cases. There are two particular cases that need clarification though:
1.) Close of the day: Before the Asian session starts, the futures market closes, and the spot Forex market has really wide spreads. Because of the spreads, I don’t really like to hold any intraday positions open through the rollover at 5:00 PM Eastern (also there is a swap). So, if I am close to Profit Target or Stop Loss I quit my position before the spreads widen. However, if my open trade is somewhere around the entry point, I usually hold it through the daily close. The reason is that widening of spreads probably won’t affect my position when I am around the entry point. Wide spreads could affect for example taking a Profit or a Stop Loss if the price was close to it during the spread widening but it is not so likely to hurt me when the current price is far from PT and SL.
2.) Close of the week: Now this is where you absolutely need to quit all your intraday trades. We are not position traders; we are short-term day traders. As such we have tighter stops which means a gap in the price could be far more devastating to us than someone position trading on the Daily chart or even those who are swing trading for that matter. In my opinion, there is never a reason for a day trader to take the risk of holding through the weekend.
Gap At Market Open
From time to time, you will see the market open with a gap and the price is exactly at my trading level (or very close to it). Even though it is a bit scary to enter the position like that, I actually like this scenario. The gap is actually another confirmation for me to enter. The reason is that the market usually tends to close the opening gaps. For that reason, a market open at my trading level is the best thing that can happen! I only need to wait a bit for the spreads to tighten before taking the position (they are usually quite wide at the market open). Check out a nice trade I took at the market open on the USD/JPY:

Old Trading Levels
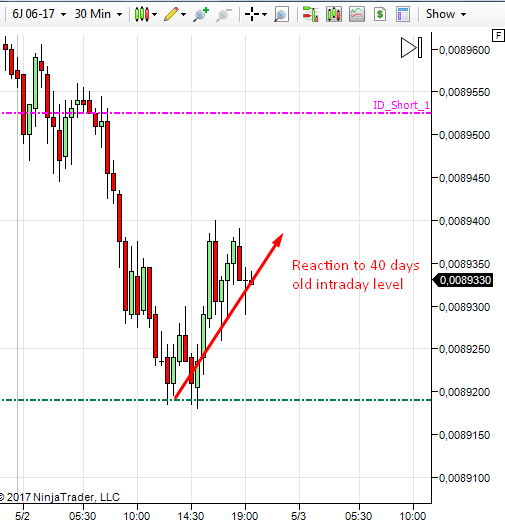
I don’t change my trading levels after I have created them. If I create a level and the price goes many pips away from it, I still consider the level valid and don’t delete or modify it. Because of that, there are many old intraday levels on my charts. Sometimes it is a bit scary to trust a 30-day old intraday level. Still, it is quite unbelievable how the market “remembers” those levels and how it reacts even after such a long time. Here is a reaction to a 40 day old level on the Japenese Yen.
I Take All Valid Trade Setups
It doesn’t matter if my day started with 3 losses, 3 winners, or anything in between; I take trades from valid levels. If there are, for example, 6 levels hit in one day, I will take all 6 trade setups. I never say anything like, “I had enough profits today, so I can stop now,” or “Damn it, 3 losses – I can’t take the pain or another loss, so I’m done trading for the day.” Instead, I stick to my plan and trade all my levels. When there is a good start to the day, there really isn’t a reason to stop trading. Sometimes there are months where only a few days generate the majority of my monthly profits. While that is not the norm, you have to trade with the expectation that it could happen which means taking all valid trades during your trading hours.
The other case is starting a day with losing trades. No one likes starting the day like this, and it can feel like the best option would be to reduce your position size or stop trading all together for the day. I never do that! I trade despite the bad start, and I don’t lower the size of my positions. A few days back I started the day with 2 losses. After that, we had 3 winners which brought us to a profit for the day. I’m really glad I didn’t stop trading or reduce my position size after those two losses or the day would have ended up in the red.
Position Sizing
I mentioned this before but to be absolutely clear, I always use the same volume size (USD-wise, not percent-wise!). I don’t change it after bad period nor after a good period. It remains the same. From time to time I do a one-time rise of volumes, and from that point, I don’t change the size again for a long time. You have to understand that I’m at the point where I’m not really building my account as it is already at the size I’m comfortable with.
If you are like most people, and still working on building a trading account and becoming a full-time forex trader, then I would recommend doing things a bit differently. For this, I recommend setting a risk that is around 2% of your entire account balance. Therefore, if you have a $10,000 account, you would risk no more than $200 on any one trade. So many times I see people overcomplicate the position sizing process when it is really quite simple. While 2% risk might not be perfect for everyone, it is the simplest way to give someone a safe risk per trade that will still allow them to grow their trading account.
The key though is not to lower the risk during a drawdown. This will result in a much longer process of digging out from under the losses. I would recommend setting your position size based on 2% risk at the beginning of the month and only adjusting the number up when you set a new ‘high water mark’ for the ending account balance. As an example, if the account goes down to $9,000 then you would keep the risk the same. If however, you end the month with $11,000 in the account then you made a $1,000 profit. You would then set your 2% risk based on the new ‘high water mark.’
Learning to Trade With Market Profile
So this is the complete set of my rules, this is how I trade 🙂
If you want to know how I create my trading levels, you can check out my Volume Profile webinar here:
Happy trading!
-Dale
P.S. – One of the things I get asked a lot is whether or not there is additional content in the member’s area. The answer to that question is obviously, YES! The course systematically goes through every aspect that we covered in great detail. This alone speeds up the learning process significantly. This isn’t the most important part though. In my opinion, the Daily Levels Commentary Video is by far the most important.
I equate this to learning to become a surgeon. No matter how long you go to school, no matter how many books you read on the subject, you still have to complete a multi-year residency program. Despite all of their training, it is still inadequate to perform their job. The ONLY thing that qualifies them to actually operate on a patient is that residency program and learning in a hands-on environment where they actually see how to apply what they were taught in the classroom.
The way I teach traders isn’t much different. I believe the course is hugely important, but just like in training a surgeon, book knowledge alone is not enough. In the Daily Levels Commentary, you see me pick the levels for the following day in ADVANCE. This does 2 things. It allows you to ‘earn while you learn,’ and it also allows you to see how the rules of the course should be applied to live market so you can do it on your own in the future.
As a final point, the members have access to a very active forum of like-minded traders. The forum is an awesome community that continues to grow by the day. This allows members to bounce trade ideas off each other and get questions answered very quickly. Additionally, you’ll have whatever support and direction you require from me as well.
If you’d like to check out everything that is included in the Trader Dale’s trading course, click here to learn more.
dear dale …
I’ve been registered before in MOST VALUE $297.
and Now I want to subscribe to MOST VALUE .. Do I have to pay 390 full? Or there is a discount for subscribers before ???
THANK U
sorry i want sing-up TO BEST VALUE
Hello Ali,
I sent you an email.
Hello, for position sizing, what would you suggest for a prop firm trading account that has a maximum drawdown limit. For example, if the account has a balance of $100,000 and a drawdown limit of $5000, would the 2% risk size be for the $5,000 or $100,000?
Thank you
Dale, your course is amazing. I am learning so much.