

Most traders spend hours finding a good entry. Then they place their exits almost at random. That is where a lot of good trades go wrong. In this article, I will show you exactly where to place your stop loss and take profit using Volume Profile. There is one simple rule behind both exits, and it works on any market and any timeframe.
I have traded with Volume Profile for well over a decade. Over that time, I learned that stop loss and take profit placement can turn a losing strategy into a winning one. The entry gets you into the trade. The exits decide how much you keep.
Here is the rule in one line. Your take profit goes before a barrier. Your stop loss goes behind a barrier. That is it. Once you understand what a barrier is and why it matters, your exits will stop feeling chaotic. You will have a clear logic you can repeat on every single trade.
We will walk through this step by step. First, you will learn what a barrier is. Then you will see how to set your target and your stop around it. Finally, we will go through three real chart examples, including two Trend Setups and one Volume Accumulation Setup. By the end, you will know how to read the chart, find the barriers, and place both exits with confidence. Let’s get to it.
Table of Contents
This Article in 5 Points
- Take profit goes before a barrier. Exit at the start of the first barrier in your way.
- Stop loss goes behind a barrier. Place it at the far edge, where the barrier protects you.
- The most common barrier is a Heavy Volume Zone. A strong price action level or VWAP can also act as one.
- Use a nearby swing point just past the barrier for extra protection on your stop.
- If the barrier fails, the trade is over. Do not hope. Just exit.
What Is a Barrier in Stop Loss and Take Profit Placement?
Before we place any exits, we need to understand one word: barrier. Everything in this article is built on it. A barrier is simply an area on the chart where price is likely to react. It is a place where buyers and sellers fought hard in the past. When price comes back to that area, the fight often starts again.
The Heavy Volume Zone: The Most Common Barrier
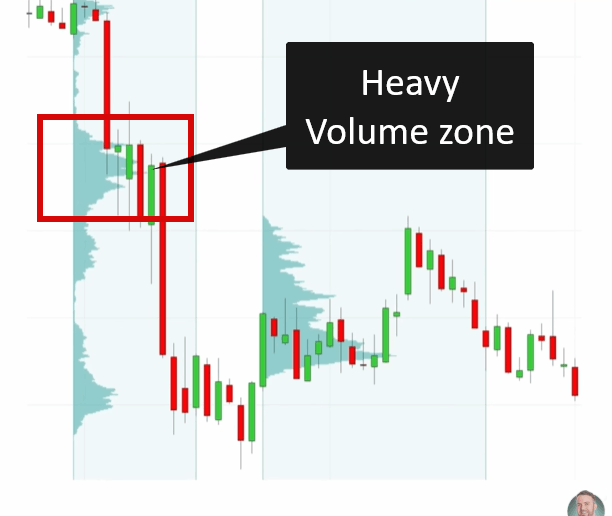
In my trading, the most common barrier by far is a Heavy Volume Zone. This is an area where a lot of volume was traded. You can see it clearly with the Volume Profile. It shows up as a thick bulge in the profile, sitting next to the price chart.
Why does heavy volume create a barrier? Big traders like banks and funds built positions there. When price returns, those traders often defend their positions. That defence can stop price or even reverse it. So a Heavy Volume Zone acts like a wall. Price might push through it, but it often struggles first.
Other Types of Barriers
A barrier does not always have to be a volume cluster. Here are the three main types I watch:
Barrier Type | What It Looks Like | How Often I Use It |
Heavy Volume Zone | A thick area in the Volume Profile | Most of the time |
Strong price action level | A clear swing high or low that price respected | Sometimes |
VWAP | The volume weighted average price line | Sometimes |
Think of a barrier as a shield and a wall at the same time. It can protect your stop loss from being hit. It can also block your trade from reaching a far target. That is exactly why it matters for both exits.
When you look at a chart, your first job is to find the barriers. Once you see them, placing your stop loss and take profit becomes simple. The barrier tells you where to exit on both sides.
How to Place Your Take Profit Before the Barrier
Let’s start with the take profit. There is one very important rule here. You always want to place your take profit before a barrier, right at its start. You do not wait for price to push deep into it.
Why You Exit at the Start of the Barrier
Imagine you are walking toward a big brick wall. You would not run straight into it. You would stop just before it. Your take profit works the same way.
When price reaches a barrier, it may reverse. If you are still in the trade, that reversal can wipe out your profit. It can even turn a winning trade into a losing one. You already made your money on the way to the barrier. So the logical thing is to take your profit at the beginning of the barrier and walk away.
How to Find the Right Take Profit Level
Here is the simple process I use:
- Mark your entry level. This is the support or resistance you plan to trade from.
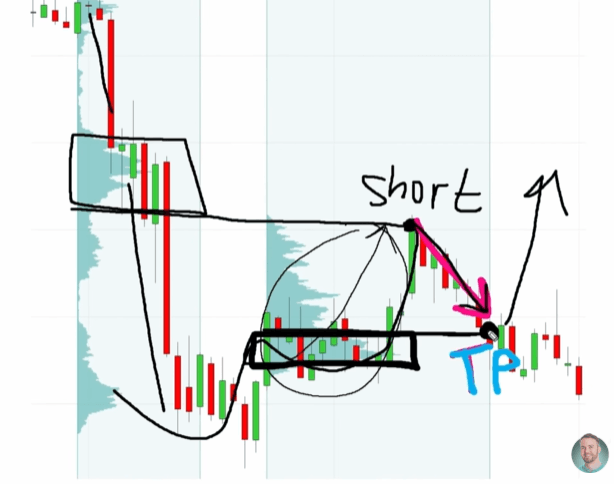
- Look at the area of the pullback. This is where price travelled on its way toward your entry level.
- Apply the Flexible Volume Profile to that area. This shows you how volume was spread out there.
- Find the first Heavy Volume Zone standing in the way of your trade.
- Place your take profit at the start of that zone, on the side closest to your entry.
What If There Are Several Barriers?
Sometimes you will see two or three volume clusters between your entry and your target. In that case, the rule stays the same. Exit at the first barrier. Trying to ride through several barriers is risky. Each one is a new chance for price to turn against you.
Yes, sometimes price will push through and keep going. You may feel you left money on the table. A smaller, safer profit is better than a big profit that often disappears.
How to Place Your Stop Loss Behind the Barrier
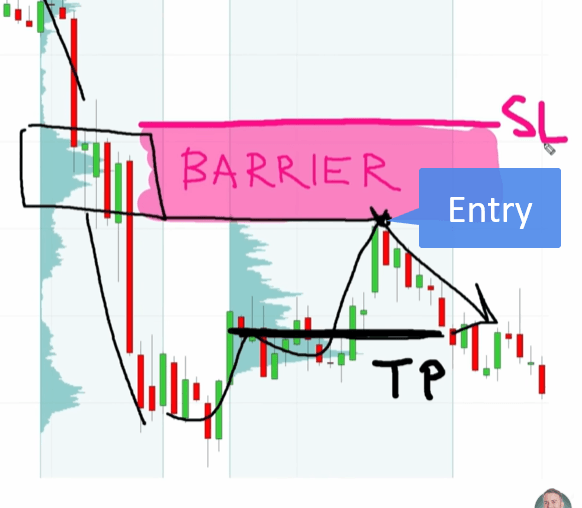
The rule here is the mirror image of the take profit rule. Your stop loss goes behind a barrier, at its far edge. The barrier is your shield. It stands between your entry and your stop.
Why the Barrier Protects Your Stop
Think about it this way. You enter a trade at the start of a Heavy Volume Zone. That zone is where big traders are likely to defend their positions. If price moves against you, it first has to fight through the whole zone. As long as the zone holds, your stop is safe.
So you do not place your stop inside the zone. You place it on the far side of the whole barrier.
The Swing Point Trick for Extra Safety
Here is a small detail I like to use. Look at the far edge of the barrier. Is there a little swing point close to it? If yes, I place my stop just behind that swing point.
This adds a little extra protection. Now price must break through the Heavy Volume Zone and the swing point before hitting my stop. If there is no swing point nearby, that is no problem. Just place your stop at the far edge of the barrier.
When the Barrier Fails, the Trade Is Over
This part is very important. If price breaks through the barrier, exit the trade. Do not move your stop. Do not hope for a turn. The barrier was the reason you took the trade. Once it fails, nobody knows where price will go next. There is no point in risking more money.
Stop Loss and Take Profit at a Glance
| Take Profit | Stop Loss |
Position | Before the barrier | Behind the barrier |
Exact spot | At the start of the first barrier | At the far edge of the barrier |
Main goal | Lock in profit before a reversal | Let the barrier shield your trade |
Extra tip | Exit at the first barrier, not later ones | Use a nearby swing point if there is one |
Example 1: Short Trade From a Daily Trend Setup
Now let’s put the rules into practice. The first example is a Trend Setup on the daily chart. By the way, the Trend Setup is the most common setup you will see. That is why most examples here use it.
Finding the Entry
The market is in a clear downtrend. Inside that downtrend, there is a significant volume cluster. This is a Heavy Volume Zone where sellers were active. We wait for price to pull back up to it. The start of this zone becomes our resistance, and we plan to go short from there.
Placing the Stop Loss
The first thing I always check is my stop. It tells me how much I can lose. Here, the barrier is the whole Heavy Volume Zone above our entry. So the stop goes behind that barrier, at its top edge.
In this example, we also have a little swing point just above the zone. That is a great spot. So I place my stop loss right behind that swing point. Now price must break the zone and the swing high to stop me out.
Placing the Take Profit
Next, I look at the area where price was rising toward our short level. I apply the Flexible Volume Profile there. It reveals a volume cluster standing in the way. That is our first barrier.
So the take profit goes at the start of that cluster. We want to exit before price fully reaches it. There is a real risk that price reacts there and bounces back up.
In this trade, price actually pushed a little past the start of the zone. So in theory, you could have taken profit lower. But that is risky. I always prefer to quit at the beginning of the Heavy Volume Zone. It is a simple and repeatable habit.
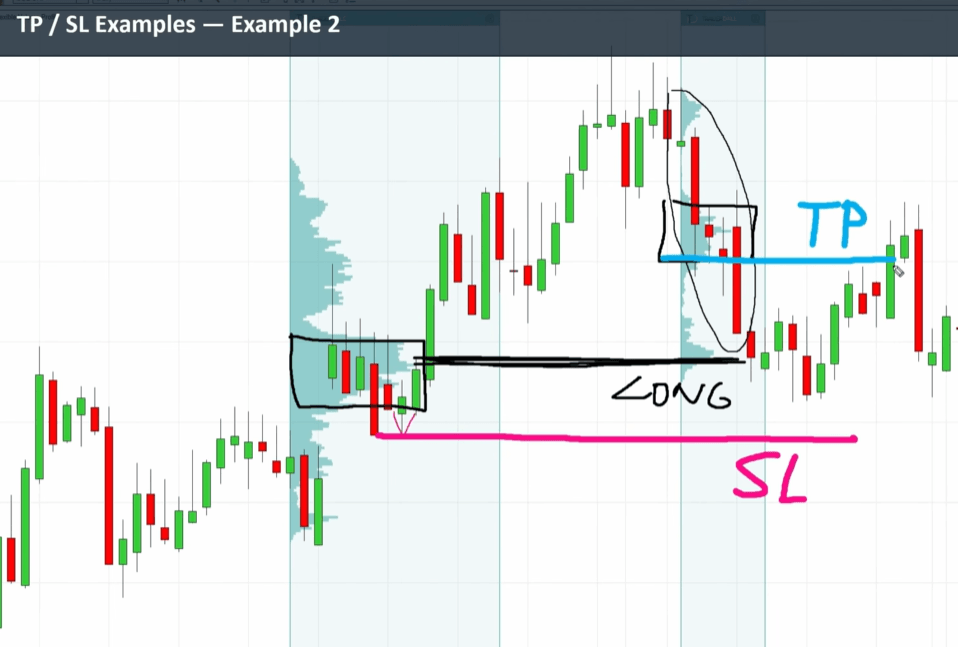
Example 2: Long Trade From a Fair Value Gap
The second example is another Trend Setup, but this time it is a long trade. It also shows how you can combine Volume Profile with price action to fine tune your entry.
Finding the Entry
Here, the market is in an uptrend. Inside that trend, there is a significant volume cluster. Normally, you could simply trade from the start of that cluster. But in this case, I see a Fair Value Gap inside the zone. So I take the long trade from the start of that gap instead.
A Fair Value Gap is a quick imbalance in price. Combining it with a volume cluster gives you a stronger, more precise entry level.
Placing the Stop Loss
The rule stays the same. The stop must go behind the barrier. In a long trade, “behind” means below. So the stop goes under the whole Heavy Volume Zone.
We also have a little swing low just below the zone. That is ideal. I place my stop behind it. Now the stop is protected by two things: the Heavy Volume barrier and the swing point. That adds a little extra safety to the trade.
Placing the Take Profit
Now I look at the area where price was falling toward my support. I check how volume was spread out there. The Volume Profile shows a volume cluster above my entry. That is the first barrier in the way.
So I place my take profit at the beginning of that cluster. This makes sure price does not react there and ruin my trade. I do not try to squeeze out extra points by going deeper into the zone.
This example shows that the rule works in both directions. For a short, the stop is above and the target is below. For a long, it is the other way around. The logic never changes. Stop behind the barrier. Target before the barrier.
Example 3: Volume Accumulation Setup
The last example uses a different setup. This is a Volume Accumulation Setup. It shows that the same stop loss and take profit rule works beyond Trend Setups.
What the Setup Looks Like
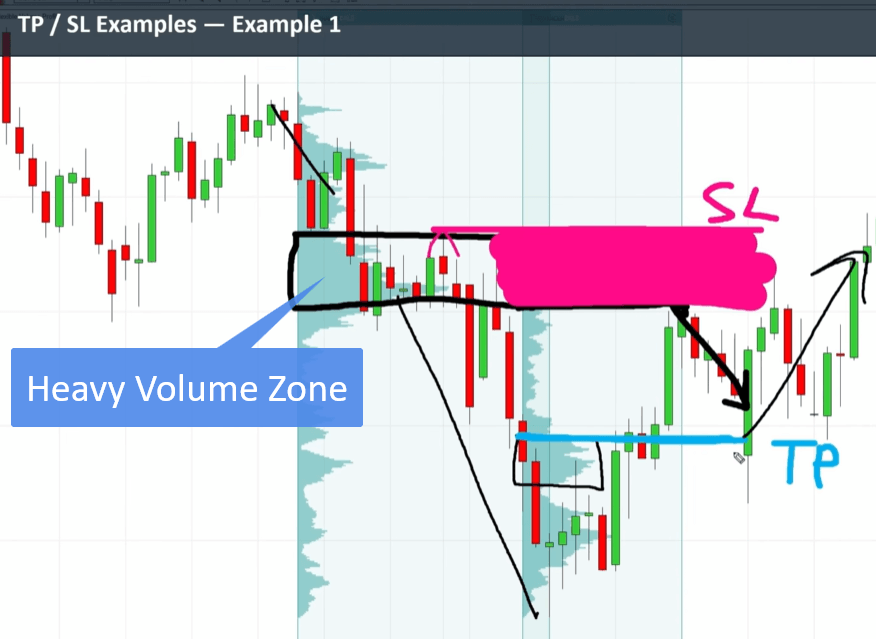
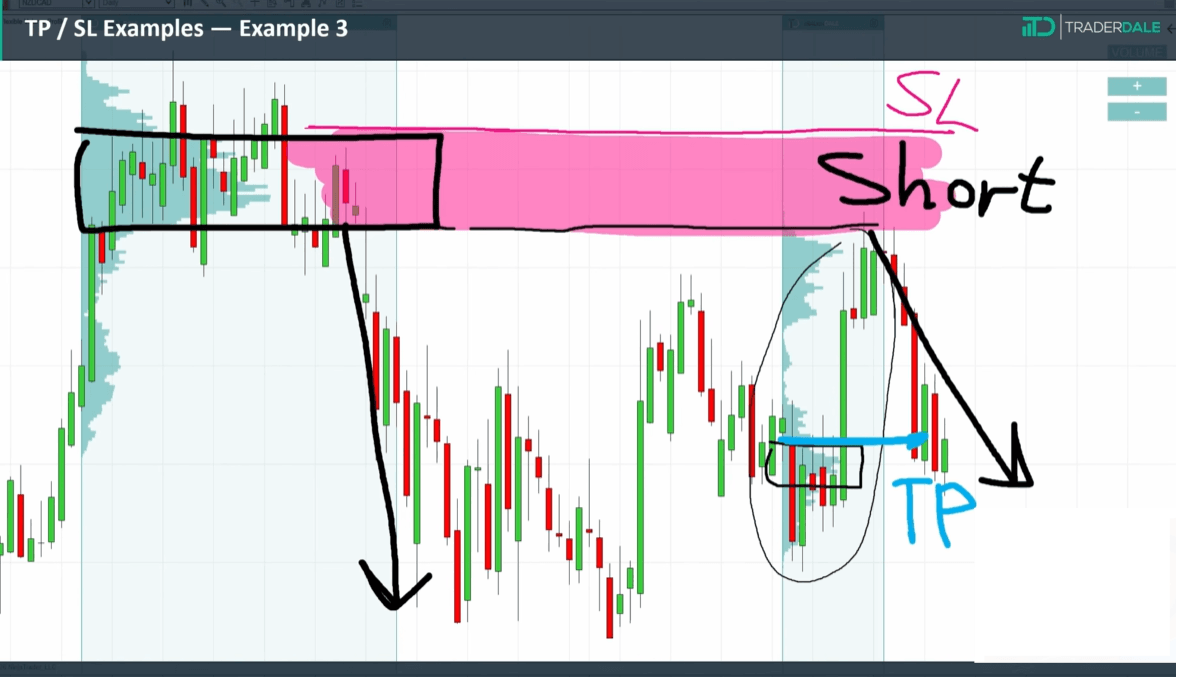
In a Volume Accumulation Setup, you see a Heavy Volume Zone followed by a strong move away from it. In this case, price built up heavy volume and then sold off hard. That sell off tells us sellers took control inside that zone.
So I mark the zone as resistance. When price comes back up to it, I plan to go short.
Placing the Stop Loss
Here, the whole area where heavy volume was traded is the barrier. It is where big sellers built their positions. So I treat the entire zone as one barrier. My stop goes behind it, just above the top edge.
This way, price has to push through the full area of heavy selling before my stop is hit. If it does, the barrier has failed. At that point, I am happy to be out of the trade.
Placing the Take Profit
Now I look at the area where price was rising back toward my short level. I check how volume was spread out there. Again, I find the first barrier standing in the way. It is another volume cluster below my entry.
The start of that cluster becomes my take profit. I do not try to ride through it. I just exit before price fully enters it.
Quick Checklist for Every Trade
You can use this checklist on any chart:
- Step 1: Find your entry level at a Heavy Volume Zone.
- Step 2: Mark the full barrier behind your entry.
- Step 3: Place your stop loss at the far edge, or behind a nearby swing point.
- Step 4: Use the Flexible Volume Profile on the pullback area.
- Step 5: Place your take profit at the start of the first barrier.
Conclusion
Setting your stop loss and take profit does not have to feel like guesswork. It all comes down to one idea: the barrier. Once you learn to spot barriers on your chart, both exits become clear and easy to repeat.
Let’s recap the key points. A barrier is an area where price is likely to react. In most cases, it is a Heavy Volume Zone that you can see with the Volume Profile. A strong price action level or VWAP can also work as a barrier.
Your take profit goes before the barrier. You exit at the start of the first barrier, because price may reverse there. You do not try to ride through several barriers. That just adds risk to a trade that is already paying you.
Your stop loss goes behind the barrier. The barrier acts as your shield. If there is a small swing point near its far edge, you can place your stop just behind it for extra safety. And if the barrier breaks, the trade is over. You exit and move on.
We saw this rule work in a short Trend Setup, a long trade from a Fair Value Gap, and a Volume Accumulation Setup. The market changed each time, but the logic stayed the same. That is the real value here. You get one simple rule that works on every trade, in every market, on every timeframe.
FAQ
Where should I place my take profit when using Volume Profile?
Place it at the start of the first barrier in your way. This is usually a Heavy Volume Zone. Exit before price fully enters it.
Where should I place my stop loss when using Volume Profile?
Place it behind the barrier, at its far edge. If there is a small swing point nearby, put your stop just behind it.
What should I do if the barrier breaks?
Exit the trade. The barrier was your reason for entering. Once it fails, there is no reason to stay in and risk more.
Ready to Find Better Trades?
Now you know where your exits belong. The next step is finding strong entries. My Volume Profile Course shows you how to spot Heavy Volume Zones, Trend Setups, and Volume Accumulation Setups in real time. Join the Academy today and start trading with a clear plan for every entry and every exit.
Apply my coupon code KEVIN10 for a 10% discount on your course pack.
